
That unmistakable craving for creamy peanut butter and rich chocolate often hits. This swift, glorious Peanut Butter Chocolate No Bake treat delivers maximum flavor without the oven. It’s pure bliss in every bite, a simple joy. Your ultimate no-fuss dessert is here.
- Quick to assemble, these delightful treats skip the oven entirely, making them perfect for last-minute cravings and busy schedules.
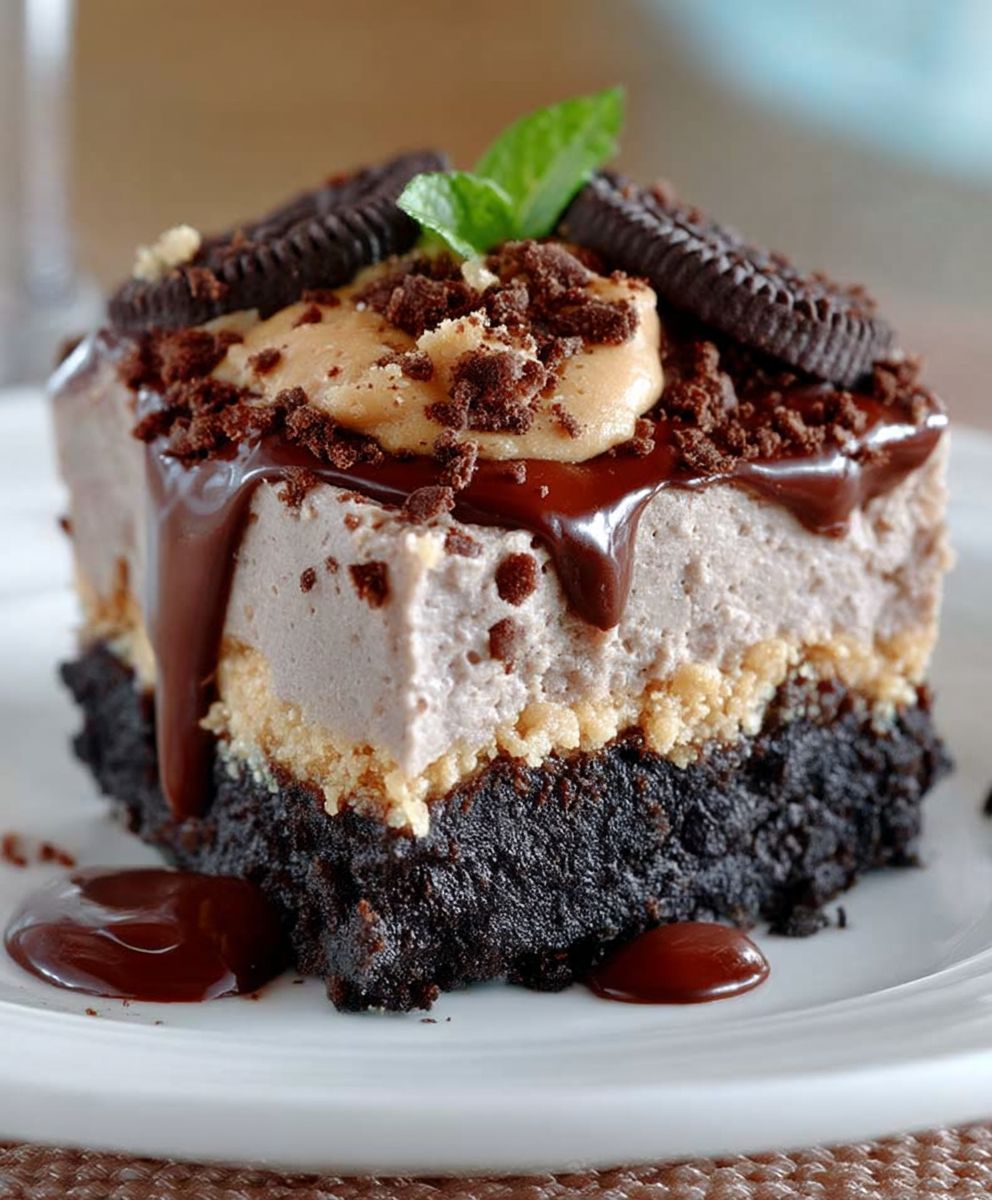
- Experience the harmonious blend of sweet, salty peanut butter with a rich, decadent chocolate topping that melts in your mouth.
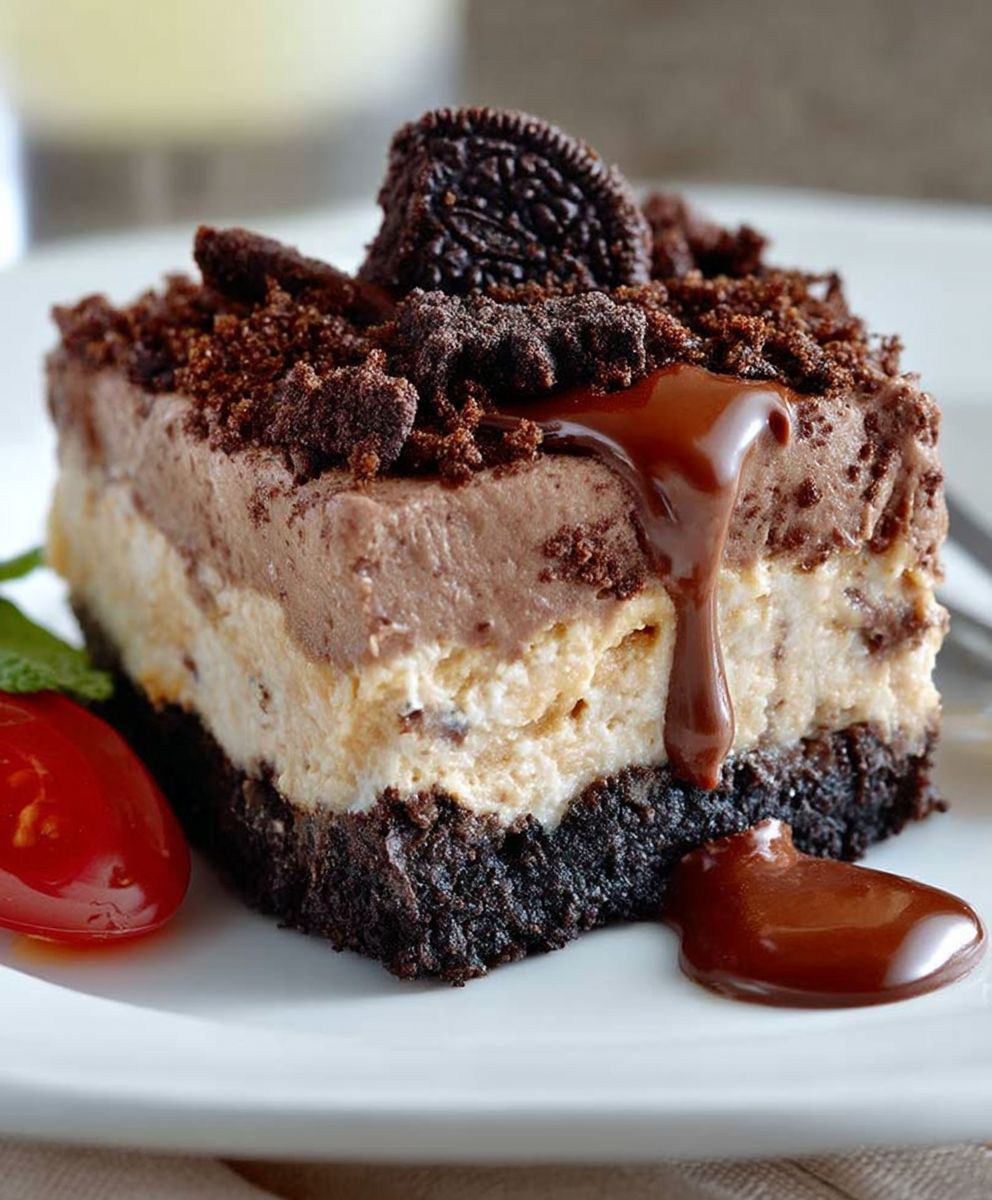
- With their distinct layers and smooth chocolate finish, these bars look impressively gourmet despite their simple, humble origins.
- Easily adaptable for various occasions, from casual family snacks to elegant dessert platters, always satisfying every sweet tooth.
Ah, the siren call of a sweet tooth! We have all been there, pacing the kitchen like a hungry tiger, eyeing the pantry with a desperate glint. One particularly chaotic week, deadlines piled high, and the kids’ schedules were relentless. My brain felt like scrambled eggs, and the thought of actual baking was simply impossible. But my sweet tooth, bless its persistent heart, was in full rebellion. That night, gazing forlornly at my empty cookie jar, salvation appeared: a forgotten recipe card for a no-bake wonder. The result? Pure, unadulterated joy that took mere minutes to assemble. That is the true beauty of making a Peanut Butter Chocolate No Bake delight – it is a testament to culinary ingenuity and instant gratification.
The Match Made in Heaven: Peanut Butter and Chocolate
Is there a more iconic pairing in the dessert world than peanut butter and chocolate? I think not! The salty, nutty richness of peanut butter, whether creamy or crunchy, provides the perfect counterpoint to the sweet, often slightly bitter depth of chocolate. It is a flavor marriage made in heaven, a symphony where each note enhances the other without overpowering. This combination creates a truly unforgettable taste experience that transcends mere sweetness, hitting all the right notes on your palate. From childhood lunchboxes to gourmet confections, this duo has captivated hearts for generations, proving some things are just meant to be together. Making something as satisfying as a Peanut Butter Chocolate No Bake treat taps into a primal desire for comfort food that is both accessible and deeply delicious.
Building the Perfect Peanut Butter Base
The foundation of any great Peanut Butter Chocolate No Bake bar lies in its peanut butter base. Achieving the perfect consistency is key: firm enough to hold its shape but tender enough to bite into easily. The secret often lies in the balance of ingredients and proper mixing. Use good quality creamy peanut butter, avoiding natural varieties that separate too much, as their oil content can make the base greasy. Powdered sugar adds structure and sweetness, while a touch of butter or a similar fat binds everything together. Some recipes benefit from graham cracker crumbs or crushed biscuits for added texture. Ensure all ingredients are well combined and pressed firmly into your pan using the back of a spoon or a flat-bottomed glass. This creates a solid base, prevents crumbling when cut, and ensures a uniform texture. A quick chill in the refrigerator then helps solidify it further, preparing it for its glorious chocolate crown.
Achieving a Flawless Chocolate Topping
Now for the grand finale: the chocolate topping. This layer provides that satisfying snap and rich flavor contrast. For a truly smooth and shiny finish, use good quality chocolate chips or chopped chocolate. Melt the chocolate gently, either using a double boiler or short bursts in the microwave, stirring frequently, to prevent burning and ensure a silky texture. Adding a small amount of neutral oil or shortening (like coconut oil or vegetable shortening) helps achieve that glossy, professional-looking sheen and prevents the chocolate from seizing. Once melted, pour the chocolate evenly over the chilled peanut butter layer. Use an offset spatula to spread it to the edges, creating a perfectly smooth surface. Work relatively quickly as the cold base will begin to set the chocolate. Give the pan a gentle tap to release air bubbles, then back to the refrigerator for the final chill. This critical step ensures clean cuts and that delightful crack when you slice into your magnificent Peanut Butter Chocolate No Bake bars.
Customization and Storage for Your No-Bake Bars
Want to elevate your Peanut Butter Chocolate No Bake game? Sprinkle flaky sea salt over the wet chocolate for a divine salty-sweet kick. Experiment with different types of chocolate – dark for intensity, milk for sweetness, or even white for a marbled effect. For textural contrast, mix crispy rice cereal or chopped roasted peanuts into the peanut butter base. A hint of vanilla or almond paste in the peanut butter layer can subtly transform the flavor profile. Always ensure ingredients are at room temperature (except the chilling layers) for smoother mixing. Do not rush the chilling process; allow ample time for both layers to set completely for the best results and easiest slicing. These small adjustments lead to big flavor rewards!
To store your delightful creations, keep them in an airtight container in the refrigerator for up to a week. The cold environment keeps the layers firm. If serving at room temperature, take them out 15-20 minutes beforehand. For longer storage, freeze individual bars or the entire slab tightly wrapped in plastic, then placed in a freezer-safe container. They can be frozen for 2-3 months. Thaw them in the refrigerator overnight or at room temperature for a few hours. Having a stash of these Peanut Butter Chocolate No Bake treats in the freezer is a sweet form of preparedness for any sudden cravings or unexpected guests.
Ingredients for Peanut Butter Chocolate No Bake
Here’s what you’ll need to make this delicious dish:
- Unsalted ButterThis provides richness and helps bind the peanut butter base, giving it a melt-in-your-mouth texture.
- Creamy Peanut ButterThe star of the show, choose a good quality creamy peanut butter for a smooth, consistent base. Avoid natural varieties that separate excessively.
- Powdered SugarEssential for sweetening the peanut butter layer and helping it set into a firm yet tender consistency.
- Alcohol-Free Vanilla ExtractA splash of vanilla enhances the overall flavor profile, adding a warm, aromatic note to the peanut butter.
- Graham Cracker CrumbsThese provide a delightful texture and additional body to the peanut butter base, making it less dense.
- Semi-Sweet Chocolate ChipsForms the decadent chocolate topping. High-quality chips melt smoothly and provide a rich flavor.
- Coconut Oil or Vegetable ShorteningA small amount helps the chocolate melt smoothly, creates a glossy finish, and prevents it from seizing.
The full ingredients list, including measurements, is provided in the recipe card directly below.
How to Make Peanut Butter Chocolate No Bake
Follow these simple steps to prepare this delicious dish:
- Prepare the Pan and Melt ButterLine an 8×8 inch (20×20 cm) baking pan with parchment paper, leaving an overhang on the sides for easy removal. In a medium microwave-safe bowl, melt the unsalted butter in 30-second intervals until fully melted.
- Create the Peanut Butter BaseAdd the creamy peanut butter to the melted butter and stir until well combined. Gradually incorporate the powdered sugar, alcohol-free vanilla extract, and graham cracker crumbs, mixing until a thick, uniform dough forms.
- Press and Chill the BaseTransfer the peanut butter mixture into the prepared baking pan. Press it down firmly and evenly using the back of a spoon or a flat-bottomed glass. Place the pan in the refrigerator to chill for at least 30 minutes, or until firm.
- Melt the Chocolate ToppingIn a separate microwave-safe bowl, combine the semi-sweet chocolate chips and coconut oil (or vegetable shortening). Microwave in 30-second intervals, stirring well after each, until the chocolate is smooth and fully melted. Alternatively, use a double boiler for gentle melting.
- Assemble and Chill the BarsPour the melted chocolate evenly over the chilled peanut butter layer. Use an offset spatula to spread it smoothly to the edges of the pan. Return the pan to the refrigerator and chill for at least 2-3 hours, or until the chocolate is completely set and firm.
- Slice and ServeOnce fully chilled, use the parchment paper overhang to lift the entire slab of Peanut Butter Chocolate No Bake bars from the pan. Place on a cutting board and slice into desired squares or rectangles using a sharp knife. Transfer to plates and drizzle with extra melted chocolate or a sprinkle of sea salt for the perfect finishing touch.
The Accidental Discovery of Sunshine on a Plate
One dreary afternoon, armed with nothing but a craving and a pantry on its last legs, I stumbled upon a recipe that promised pure delight without turning on the oven. The result was this glorious creation, a Peanut Butter Chocolate No Bake treat, a true ray of sunshine that banished my gloomy mood with its rich, satisfying sweetness.
Perfecting the Cooking Process
For these no-bake wonders, efficiency is key. Start by melting your butter and sugar mixture on the stovetop, ensuring it reaches a rolling boil for the right texture. While that cools slightly, measure your peanut butter and dry ingredients, having them ready for a swift, smooth incorporation into the chocolatey base.
Add Your Touch
Feel free to experiment with this versatile recipe! Swap in almond butter for a different nutty twist, or add a pinch of cinnamon or a dash of alcohol-free vanilla extract for extra warmth. For a crunchy surprise, fold in some chopped roasted almonds or a handful of dried cranberries before chilling.
Storing & Reheating
Keep your delightful no-bake squares fresh in an airtight container in the refrigerator for up to a week. While reheating isn’t necessary, letting them sit at room temperature for 10-15 minutes before serving enhances their creamy texture and brings out their full flavor.
Here are some expert tips for mastering your Peanut Butter Chocolate No Bake treats:
- Ensure your sugar mixture comes to a full, rolling boil for precisely one minute to achieve the perfect firm, yet chewy, texture.
- Measure your peanut butter accurately and have it at room temperature; this ensures it blends seamlessly into the hot mixture without clumping.
- For a cleaner cut, chill your finished no-bake squares thoroughly for at least two hours before slicing, using a sharp, warm knife.
My nephew, a self-proclaimed dessert critic, once devoured three of these Peanut Butter Chocolate No Bake squares in quick succession, declaring them “better than birthday cake!” It’s a memory that always makes me smile.
The Irresistible Allure of No-Bake Desserts
There’s a special kind of magic that comes with a no-bake dessert. It’s the promise of instant gratification, the joy of skipping the oven on a sweltering day, and the sheer simplicity of whipping up something incredibly delicious with minimal fuss. For those moments when a sweet craving hits hard and fast, or when you simply don’t have the time (or energy!) for a full-blown baking marathon, a no-bake option is an absolute lifesaver. These culinary marvels transform everyday pantry staples into extraordinary treats, offering a delightful escape from complex recipes without sacrificing flavor or texture. They are the unsung heroes of quick desserts, perfect for spontaneous gatherings, last-minute potlucks, or simply satisfying that insistent sweet tooth right now.
The beauty of a no-bake creation lies not just in its ease, but also in its versatility. Imagine a dessert that requires no preheating, no careful monitoring of oven temperatures, and no worrying about burnt edges. Instead, you get to enjoy a straightforward process of mixing, chilling, and then indulging. This approach opens up a world of possibilities for busy individuals, novice cooks, and seasoned bakers alike. It’s a testament to the fact that you don’t need fancy equipment or advanced techniques to create something truly spectacular. Embrace the simplicity, savor the process, and prepare to fall in love with the convenience and deliciousness that no-bake treats bring to your kitchen.
Why Peanut Butter Chocolate No Bake Reigns Supreme
Among the pantheon of no-bake desserts, the Peanut Butter Chocolate No Bake bar holds a particularly revered place. It’s a timeless classic that evokes childhood memories, yet sophisticated enough to grace any adult gathering. The combination of rich, creamy peanut butter and decadent chocolate is a match made in culinary heaven, a flavor duo that has captivated taste buds for generations. What makes this particular no-bake recipe so incredibly popular? Perhaps it’s the perfect balance of sweet and savory, the satisfying chewiness, or the delightful way it melts in your mouth. Whatever the secret, these squares are undeniably addictive, offering a comfortingly familiar taste that always hits the spot.
This recipe’s enduring appeal also stems from its accessibility. Most of the ingredients are likely already in your pantry: sugar, milk, butter, cocoa powder, oats, and, of course, that glorious peanut butter. There’s no need for obscure items or last-minute grocery runs. It’s a budget-friendly dessert that delivers a luxurious experience. Plus, the preparation is so straightforward that it’s an excellent choice for cooking with children, making it a fun family activity. The joy of creating something so delicious with your own hands, without the stress of conventional baking, is truly rewarding. Get ready to elevate your dessert game with these magnificent Peanut Butter Chocolate No Bake delights.
Assembling Your Sweet Arsenal: Essential Ingredients
Before embarking on this delightful no-bake adventure, gathering your ingredients is crucial. Think of it as assembling your special forces team, each component playing a vital role in the success of your Peanut Butter Chocolate No Bake mission. The good news? You won’t need anything exotic or hard-to-find. Just a few everyday staples will transform into something truly extraordinary. Accuracy in measurement is important here, as with any recipe, to ensure the perfect consistency and flavor balance. Imagine the perfect blend of creamy, sweet, and slightly salty, all coming together in harmony.
Let’s dive into the roster of heroes for your no-bake masterpiece:
- Granulated Sugar:2 cups. This provides the essential sweetness and helps create the foundational syrup.
- Milk:½ cup. Any milk variety works beautifully here, adding moisture and richness.
- Unsalted Butter:½ cup (1 stick). The creamy base that binds everything together and adds a luscious texture.
- Unsweetened Cocoa Powder:¼ cup. For that deep, rich chocolate flavor we all adore.
- Creamy Peanut Butter:1 cup. The star of the show, providing the nutty, savory balance.
- Alcohol-Free Vanilla Extract:1 teaspoon. A splash of vanilla enhances all the other flavors beautifully.
- Quick-Cooking Oats:3 cups. These provide structure, chewiness, and that classic no-bake texture.
- Pinch of Salt:¼ teaspoon (optional, but highly recommended). A little salt goes a long way in balancing sweetness and enhancing flavor.
Tools of the Trade (No Oven Required!)
One of the many beautiful things about crafting these Peanut Butter Chocolate No Bake squares is the minimal equipment required. You won’t be hauling out heavy stand mixers or worrying about specialized baking tins. This recipe is designed for simplicity, making it accessible even in the most modestly equipped kitchens. Think of these as your trusty sidekicks, ready to assist you in creating pure dessert magic without breaking a sweat. Having these items at hand before you begin ensures a smooth and enjoyable process from start to finish. Get ready for an easy culinary journey.
- Medium Saucepan:For melting and combining the wet ingredients on the stovetop.
- Large Mixing Bowl:To eventually combine all the ingredients into a glorious mixture.
- Measuring Cups and Spoons:Precision is key for the perfect balance of flavors and textures.
- Whisk or Sturdy Spoon:For stirring the mixture vigorously to prevent sticking and ensure smoothness.
- 9×13 inch Baking Pan:Lined with parchment paper for easy removal and slicing.
- Spatula or Offset Spatula:For spreading the mixture evenly into the prepared pan.
- Airtight Container:For storing your delicious creations once they’re chilled and sliced.
The Grand Assembly: Step-by-Step Peanut Butter Chocolate No Bake Magic
Alright, culinary adventurers, it’s time to bring these incredible ingredients together and create something truly magnificent. This is where the Peanut Butter Chocolate No Bake magic truly happens! Follow these steps carefully, and you’ll be on your way to a tray of irresistible treats that will have everyone begging for the recipe. Remember, patience with the chilling process is a virtue, as it’s what transforms a gooey mixture into perfectly sliceable squares.
Melting Moments: The Chocolatey Base
- Line a 9×13 inch baking pan with parchment paper, leaving an overhang on the sides for easy lifting. Set aside.
- In your medium saucepan, combine the granulated sugar, milk, unsalted butter, and unsweetened cocoa powder.
- Place the saucepan over medium heat and bring the mixture to a rolling boil, stirring constantly to prevent sticking and ensure everything melts smoothly.
- Once it reaches a full, rolling boil, continue boiling for exactly one minute, still stirring. This critical step ensures the right texture.
- Remove the saucepan immediately from the heat.
The Peanut Butter Perfection: Combining Flavors
- Quickly stir in the creamy peanut butter and alcohol-free vanilla extract into the hot chocolate mixture. Stir vigorously until the peanut butter is completely melted and smoothly incorporated, creating a luscious, uniform base.
- Add the quick-cooking oats and the optional pinch of salt to the mixture.
- Stir everything together until the oats are thoroughly coated and distributed evenly throughout the chocolatey peanut butter concoction. This might take a bit of elbow grease, but it’s worth it!
Setting the Stage: Chill Out!
- Pour the entire mixture into your prepared 9×13 inch baking pan.
- Using a spatula or offset spatula, spread the mixture evenly into a flat, compact layer. Press down firmly to ensure it’s dense and uniform.
- Transfer the pan to the refrigerator and chill for at least 2 hours, or until the squares are completely firm. This is non-negotiable for clean slices!
- Once thoroughly chilled, use the parchment paper overhangs to lift the entire slab out of the pan.
- Place the slab on a cutting board and slice it into desired squares or bars.
- Serve immediately or store them for later enjoyment.
Unleashing Your Inner Dessert Alchemist: Customization Ideas
The beauty of a recipe like Peanut Butter Chocolate No Bake is that it serves as a fantastic canvas for your culinary creativity. While delicious in its classic form, there’s a whole world of possibilities for adding your unique touch. Don’t be afraid to get a little adventurous and turn these humble squares into something truly personalized. Consider the preferences of your guests or simply what ingredients are calling to you from the pantry. These simple tweaks can transform a great treat into an unforgettable one, making each batch a delightful new experience.
- Nut Butter Swaps:Instead of traditional peanut butter, try almond butter for a milder, slightly sweeter flavor, or cashew butter for an extra creamy texture. Ensure they are the creamy, no-stir varieties for the best results.
- Added Crunch:Fold in a half-cup of chopped roasted nuts like pecans, walnuts, or even lightly salted peanuts for an extra textural dimension. A sprinkle of mini chocolate chips or cocoa nibs can also add a delightful bite.
- Flavor Boosters:A pinch of instant coffee granules dissolved in the hot mixture can deepen the chocolate flavor. A dash of pure orange extract can also create a wonderful chocolate-orange pairing.
- Topping Temptations:Before chilling, sprinkle the top with flaky sea salt to enhance both the sweet and savory notes. Drizzle with melted white chocolate or a sprinkle of colorful sprinkles once chilled for an extra festive look.
- Dried Fruit Fun:For a touch of fruitiness and chew, mix in a handful of dried cranberries, chopped dried apricots, or golden raisins with the oats.
Keeping Your No-Bake Treats Fresh
You’ve poured your heart (and a lot of delicious ingredients) into creating these amazing Peanut Butter Chocolate No Bake squares, so let’s make sure they stay fresh and fabulous for as long as possible. Proper storage is key to maintaining their perfect texture and flavor, ensuring every bite is as delightful as the first. While they’re often devoured quickly, knowing how to store them effectively means you can enjoy these treats over several days, or even prepare them ahead of time for future indulgence. A little planning goes a long way in preserving your culinary masterpieces.
Once your no-bake squares are firm and sliced, the best way to store them is in an airtight container. Arrange them in a single layer if possible, or separate layers with parchment paper to prevent sticking. They will keep beautifully in the refrigerator for up to 5-7 days. The cold helps maintain their firm texture and prevents them from becoming too soft. If you find yourself with a particularly large batch or want to save some for a rainy day, these no-bake treats also freeze wonderfully. Place the sliced squares in a single layer on a baking sheet and freeze until solid, about an hour. Then, transfer the frozen squares to a freezer-safe, airtight container or bag. They can be stored in the freezer for up to 2-3 months. Thaw them in the refrigerator overnight or at room temperature for about 30 minutes before serving for that perfect, chewy consistency. This makes them a fantastic make-ahead option for entertaining!
Conclusion for Peanut Butter Chocolate No Bake
And there you have it, a journey from a dreary afternoon to a plate full of pure joy! These Peanut Butter Chocolate No Bake squares truly are a testament to the fact that the most delicious things often require the least effort. With their irresistible combination of creamy peanut butter and rich chocolate, balanced by the satisfying chew of oats, they’re a timeless classic that brings smiles all around. Easy to make, versatile for customization, and perfect for any occasion, they’re a guaranteed crowd-pleaser that requires no oven and minimal fuss. So go ahead, whip up a batch, and treat yourself to a little slice of heaven that’s always a delightful surprise.
Print
Peanut Butter Chocolate No Bake
Whip up irresistible Peanut Butter Chocolate No Bakes! Just a minute-long boil of sugar, milk, butter, cocoa, then stir in creamy PB. Simple, rich, and so satisfying. Full recipe & nutrition data.
- Total Time: 35 minutes
- Yield: 4 servings 1x
Ingredients
- 2 cups granulated sugar
- 1/2 cup milk
- 1/2 cup unsalted butter (1 stick)
- 1/4 cup unsweetened cocoa powder
- 1 cup creamy peanut butter
- 1 teaspoon vanilla bean paste
- 3 cups quick-cooking oats
Instructions
- Step 1: Combine the granulated sugar, milk, butter, and cocoa powder in a medium saucepan over medium heat. Stir frequently until the butter is melted and the mixture comes to a full rolling boil.
- Step 2: Once boiling, continue to boil for exactly 1 minute, stirring constantly to prevent scorching. Remove the saucepan from the heat immediately.
- Step 3: Quickly stir in the creamy peanut butter and alcohol-free vanilla extract until completely melted and smooth, ensuring no lumps remain.
- Step 4: Add the quick-cooking oats to the mixture and stir thoroughly until all the oats are evenly coated with the chocolate peanut butter mixture.
- Step 5: Using a spoon or a small cookie scoop, drop rounded tablespoons of the mixture onto sheets of wax paper or parchment paper.
- Step 6: Allow the cookies to cool at room temperature for about 30 minutes, then transfer them to the refrigerator for at least 1 hour, or until fully set.
Notes
- To keep your delicious no-bake cookies at their best, store them in an airtight container in the refrigerator; they'll stay perfectly firm and fresh for up to a week.
- While these aren't meant to be "reheated," you can let them sit at room temperature for 10-15 minutes before serving if you prefer a slightly softer, chewier texture straight from the fridge.
- These rich, fudgy bites are absolutely delightful served with a cold glass of milk, alongside your morning coffee, or even crumbled over a scoop of vanilla bean ice cream for an indulgent dessert.
- The precise 1-minute full rolling boil in Step 2 is crucial for your cookies to set properly; ensure you stir constantly during this time to prevent scorching, then quickly mix in the peanut butter, vanilla, and oats before the mixture cools too much.
- Prep Time: 15 minutes
- Cook Time: 20 minutes
- Method: Stovetop
- Cuisine: American
Nutrition
- Serving Size: 1 square (approx. 2"x2")
- Calories: 240
- Sodium: 95mg
- Fat: 14g
- Saturated Fat: 5g
- Trans Fat: 0g
- Protein: 26g

Leave a Comment