
Remember that sweltering summer day when the mere thought of turning on the oven brought beads of sweat to your brow? That’s when I discovered the magic of no-bake wonders, a true culinary revelation. This is yourUltimate No Bake Dessert Guide, packed with pure joy and zero oven time. Get ready to whip up magic without breaking a sweat or even thinking about a preheated oven. These treats are a game-changer for anyone who loves dessert but dreads the baking process, offering deliciousness with minimal fuss and maximum flavor. They are perfect for impromptu gatherings or when you just need a sweet escape without the kitchen becoming a sauna.
- This dessert comes together with incredible ease, making it perfect for novice cooks or busy schedules, proving that gourmet flavors don’t require complex steps.
- The flavor profile is a delightful symphony of sweet and tangy, balancing creamy richness with the vibrant freshness of ripe berries.
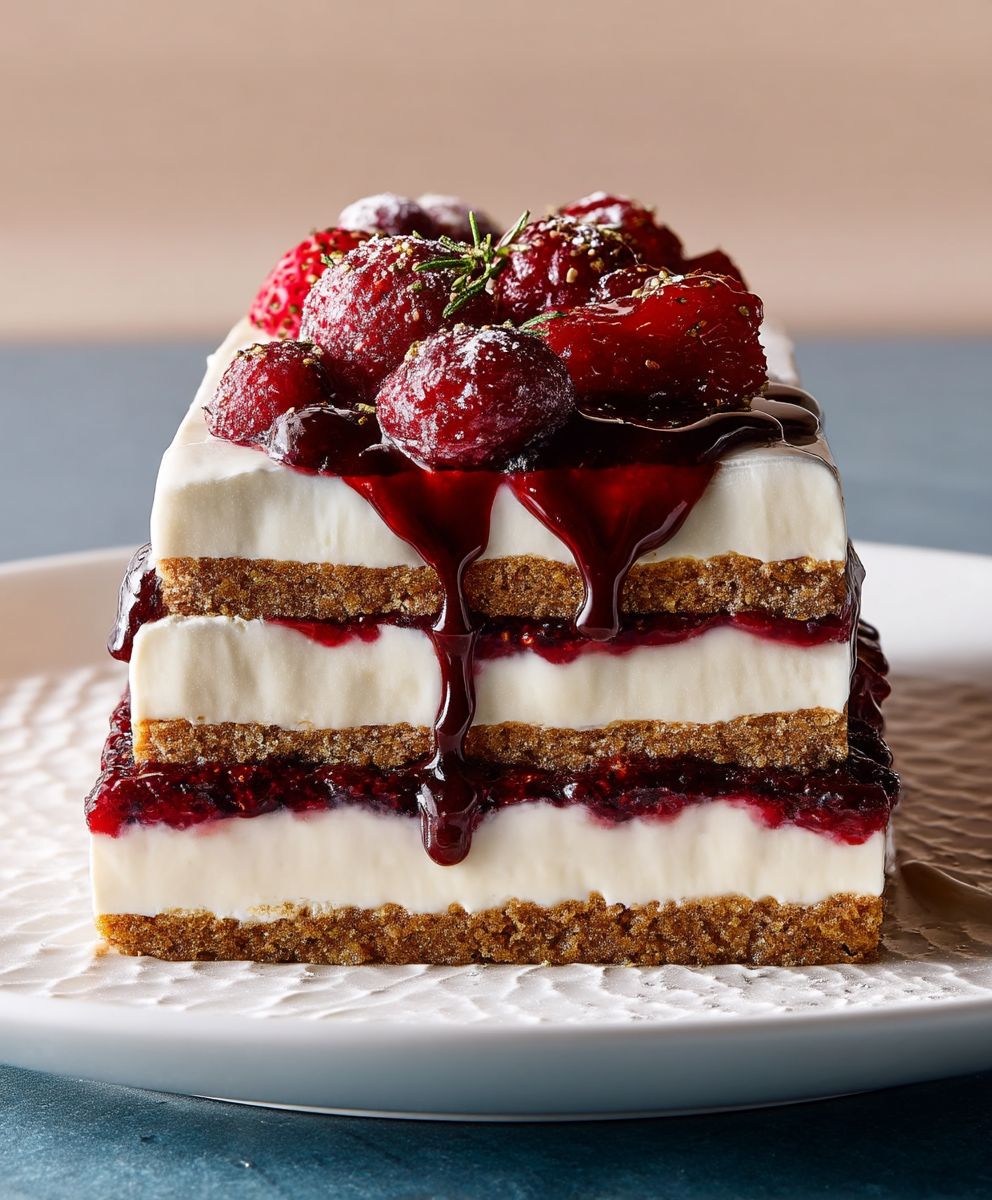
- Visually, it’s a stunning layered creation, a vibrant feast for the eyes that will impress guests before they even take their first bite.
- Its versatility shines through with endless possibilities for fruit combinations and crust variations, allowing for personalized culinary adventures.
Ingredients for Creamy Dream No-Bake Berry Delight
Here’s what you’ll need to make this delicious dish:
- Graham Cracker CrumbsThese form the crunchy foundation of our dessert, providing a delightful texture contrast. Choose plain crumbs or a subtly flavored variety for the best base.
- Unsalted ButterMelted butter binds the graham cracker crumbs together, creating a sturdy yet tender crust without any baking required. Make sure it’s unsalted to control the overall sweetness.
- Cream CheeseThe star of our creamy filling, full-fat cream cheese provides a rich, tangy base that sets beautifully when chilled. Ensure it’s softened to room temperature for a smooth mixture.
- Sweetened Condensed MilkThis ingredient adds a luscious sweetness and helps to thicken our filling to the perfect consistency. It’s crucial for achieving that signature no-bake texture.
- Fresh Lemon JuiceA squeeze of fresh lemon juice brightens the entire dessert, cutting through the richness and enhancing the berry flavors. Always opt for fresh over bottled for superior taste.
- Vanilla Bean PasteJust a splash of good quality vanilla bean paste adds a warm, aromatic depth to the creamy filling. Pure vanilla bean paste is recommended for the best flavor.
- Heavy CreamWhipped to soft peaks, heavy cream provides an airy lightness and luxurious mouthfeel to the dessert. Ensure it is very cold before whipping for optimal volume.
- Mixed BerriesA medley of fresh berries, such as strawberries, blueberries, raspberries, and blackberries, offers bursts of natural sweetness and vibrant color. Wash and gently pat them dry before use.
The full ingredients list, including measurements, is provided in the recipe card directly below.
How to Make Creamy Dream No-Bake Berry Delight
Follow these simple steps to prepare this delicious dish:
Step 1: Prepare the Crumb Crust
Begin by crushing your graham crackers into fine crumbs. A food processor makes this quick work, but a zip-top bag and a rolling pin work just as well, providing a therapeutic stress-reliever! In a medium bowl, combine the graham cracker crumbs with the melted unsalted butter. Mix thoroughly until the crumbs are evenly moistened, resembling wet sand. Press this mixture firmly into the bottom of individual serving glasses or a 9×13-inch dish. Use the back of a spoon or the bottom of a glass to compact it tightly. Place the crust in the refrigerator to chill while you prepare the filling. This initial chill helps the crust set properly and prevents it from crumbling too easily.
Step 2: Create the Creamy Filling
In a large mixing bowl, beat the softened cream cheese until it’s light and fluffy, ensuring there are no lumps. This is key for a smooth, velvety texture. Gradually add the sweetened condensed milk, mixing until thoroughly combined. Stir in the fresh lemon juice and vanilla bean paste, blending until everything is incorporated and fragrant. In a separate, chilled bowl, whip the cold heavy cream until soft peaks form. Gently fold the whipped cream into the cream cheese mixture using a spatula, being careful not to deflate the air you’ve just incorporated. This folding technique ensures a light and airy filling.
Step 3: Layer the Dessert
Retrieve your chilled crust. Spoon half of the creamy filling over the crust, spreading it evenly. Next, scatter about a third of your fresh mixed berries over this layer. Spoon the remaining cream cheese filling over the berries, spreading gently to cover them. Top with another generous layer of fresh berries, reserving a few for garnish. If using individual glasses, alternate layers of crust, filling, and berries until the glasses are full, ensuring the final layer is a vibrant burst of fruit. This creates an appealing visual and ensures every bite offers a medley of flavors.
Step 4: Chill and Serve
Cover the assembled dessert loosely with plastic wrap and refrigerate for at least 4 hours, or ideally overnight. Chilling is essential as it allows the filling to firm up and the flavors to meld beautifully, transforming it from a collection of ingredients into a cohesive, delectable treat. Just before serving, add the reserved fresh berries as a final flourish.
Transfer to plates or present the individual glasses, garnishing with extra berries and a mint sprig for the perfect finishing touch.
Why Go No-Bake? The Ultimate Convenience Factor
The beauty of the no-bake dessert tradition isn’t just about avoiding a hot oven on a sweltering day; it’s about pure, unadulterated convenience wrapped in deliciousness. I remember countless times planning a dinner party, only to realize I’d completely forgotten about dessert until the last minute. Panic would set in, followed by the realization that my oven was already occupied with a roast, or simply that I didn’t have the time to bake and cool something elaborate. That’s when the no-bake revolution truly began for me. With anUltimate No Bake Dessert Guidelike this, you unlock a world where dessert is never an afterthought, but a breezy, stress-free delight. You save on energy, keep your kitchen cool, and still deliver a show-stopping sweet. It feels like cheating, but in the best possible way imaginable. The magic truly lies in the simplicity. There’s no worrying about uneven baking, sunken centers, or over-browning. You mix, you chill, and you’re done. This means more time enjoying your guests, your family, or simply indulging in a moment of peace, rather than frantically hovering over an oven door. For busy parents, hurried hosts, or anyone simply craving a quick reward, these desserts are a revelation. They prove that you don’t need to be a pastry chef to create something truly memorable and utterly delicious. Embrace the cool side of dessert making, and your taste buds will thank you profusely.
Crafting Your No-Bake Masterpiece: Tips and Tricks
Achieving no-bake perfection is less about magic and more about a few smart strategies. First, always ensure your cream cheese is truly at room temperature. Trying to beat cold cream cheese results in lumps, which no amount of mixing can completely smooth out later. So, plan ahead and take it out of the fridge at least an hour before you begin. Another vital tip involves chilling time. While 4 hours might seem like an eternity when a delicious dessert awaits, patience is truly a virtue here. The full chilling period allows the cream cheese mixture to firm up properly, preventing a runny or messy presentation. It also gives the flavors ample time to meld and deepen, transforming simple ingredients into a harmonious treat. When it comes to the heavy cream, make sure it’s ice-cold before whipping. Chilled cream whips up faster and holds its peaks better, providing that essential lightness to your filling. If your kitchen is warm, consider chilling your mixing bowl and whisk for 10-15 minutes beforehand. For the crust, don’t be shy about pressing those crumbs down firmly. A well-compacted crust is a stable crust, ensuring your layers hold together beautifully. If you’re using individual glasses, you can even use a small spice jar or the end of a wooden spoon to really get that base tight. Finally, for an extra touch of flavor and texture, consider toasting your graham cracker crumbs lightly in a dry pan for a few minutes before mixing them with butter; this deepens their nutty flavor profile significantly.
Beyond the Berries: Creative Variations for Your No-Bake Dessert Guide
While our Creamy Dream No-Bake Berry Delight is undeniably fantastic, the true beauty of following anUltimate No Bake Dessert Guideis the endless adaptability. You are the artist, and your kitchen is the canvas! Don’t feel limited by mixed berries. Imagine a tropical version featuring diced mango, pineapple, and passionfruit, perhaps with a hint of coconut extract in the cream cheese filling. Or how about a citrus explosion with segments of oranges, grapefruit, and lime zest? The bright, zesty notes would be incredibly refreshing. The crust is another area ripe for experimentation. Instead of graham crackers, try crushed vanilla wafers, chocolate sandwich cookies (cream removed), or even ginger snaps for a spicy kick. For an even richer base, a combination of crushed nuts and cookie crumbs can create a unique texture and flavor. And why stop at a single layer of fruit? You could swirl fruit purees into part of the cream cheese mixture for a marbled effect or add a thin layer of fruit jam between the creamy sections for an extra burst of concentrated flavor. A sprinkle of mini chocolate chips, shredded coconut, or chopped roasted nuts on top could add another layer of texture and visual appeal. The possibilities are truly as vast as your imagination, allowing you to tailor this treat to any season or craving.
Storage Savvy: Keeping Your No-Bake Treats Fresh
Once you’ve successfully whipped up your delightful no-bake dessert, the next logical question is how to keep it fresh and delicious. Proper storage is key to extending the life of your creation and ensuring every bite is as good as the first. This Creamy Dream No-Bake Berry Delight will keep beautifully in the refrigerator for up to 3-4 days when stored correctly. To store, simply cover the dish or individual serving glasses tightly with plastic wrap. This prevents the dessert from absorbing any unwanted odors from the refrigerator and, more importantly, keeps the creamy filling from drying out. If you’ve made the dessert in a larger dish, you can cut individual servings and store them in airtight containers for even better protection. While the dessert can be frozen, the texture of the cream cheese filling might change slightly upon thawing, potentially becoming a little grainy. The fresh berries will also likely soften considerably. If you do choose to freeze, ensure it’s well-wrapped in multiple layers of plastic wrap and then foil, and consume within a month for best quality. Thaw overnight in the refrigerator before serving. For optimal enjoyment, it’s always best consumed within the first few days, allowing the flavors to remain vibrant and the textures perfectly balanced.
Can I use different fruits for this Ultimate No Bake Dessert Guide recipe?
Yes, absolutely! This is anUltimate No Bake Dessert Guidethat encourages creativity. Feel free to substitute the mixed berries with any fresh fruit you prefer. Sliced peaches, cherries, kiwi, or even a mix of tropical fruits like mango and pineapple would be delightful. Just ensure your chosen fruits are ripe and not overly watery.
How long does this dessert need to chill?
For the best results, this dessert needs to chill in the refrigerator for a minimum of 4 hours. However, chilling it overnight is highly recommended as it allows the filling to firm up completely and the flavors to fully meld together, enhancing the overall taste and texture.
Can I prepare this recipe ahead of time?
Yes, this is an excellent make-ahead dessert! You can prepare the entire Creamy Dream No-Bake Berry Delight up to 1-2 days in advance. Just be sure to cover it tightly with plastic wrap and store it in the refrigerator. Add any final fresh berry garnishes right before serving.
What can I use if I don’t have graham cracker crumbs?
If you don’t have graham cracker crumbs, you can easily substitute them with other crushed cookies. Vanilla wafers, digestive biscuits, shortbread cookies, or even plain chocolate cookies (without the cream) work wonderfully to create a delicious and stable no-bake crust.
Is this dessert suitable for a large gathering?
Absolutely! This dessert is perfectly suited for large gatherings. You can easily double the recipe and prepare it in a larger pan or individual servings, making it a convenient and crowd-pleasing option that requires no last-minute oven fuss. So there you have it, your passport to a world of delectable desserts that defy the need for an oven. This Creamy Dream No-Bake Berry Delight is just the beginning of your journey into effortless sweetness. Go forth, chill, and conquer your dessert cravings with confidence and a knowing wink to your underutilized oven!
Perfecting the Cooking Process

For a truly effortless “Ultimate No Bake Dessert Guide” experience, preparation is paramount. Ensure all ingredients are at room temperature as specified, and chill your mixing bowls if using dairy-based creams. Layer ingredients meticulously for visual appeal and always allow adequate refrigeration time for optimal setting and flavor development. This process ensures perfect results every time.
Why No-Bake Desserts are Your New Best Friend
Picture this: It’s a sweltering summer evening, your oven is on strike (or you just don’t want to crank it up), and suddenly, a craving for something sweet and spectacular hits. What’s a dessert enthusiast to do? Enter the glorious realm of no-bake desserts! These culinary champions swoop in to save the day, offering decadent delights without the fuss, sweat, or even the need for a working oven. Forget preheating, waiting, and anxiously peering through a glass door. With this comprehensive guide, you’re on a fast-track to impressing friends, delighting family, and satisfying your sweet tooth with minimal effort but maximum impact.
I once tried to bake a cheesecake in the middle of a heatwave. The kitchen transformed into a sauna, I looked like I’d run a marathon, and the cheesecake? It decided to crack in protest, mocking my efforts. That’s when I truly embraced the no-bake philosophy. It’s a rebellion against the tyranny of high temperatures, a testament to the fact that pure deliciousness doesn’t always need a fiery furnace. These recipes are perfect for busy weeknights, last-minute celebrations, or when you simply want to feel like a culinary wizard without actually having to don a scorching apron. Plus, they often look incredibly elegant, fooling everyone into thinking you spent hours slaving away. The secret? We’ll never tell!
Unlocking theUltimate No Bake Dessert Guide: Essential Tools
You don’t need an arsenal of sophisticated gadgets to become a no-bake maestro. A few simple tools will empower you to create magic. Think of a good whisk as your trusty wand, capable of transforming liquid cream into fluffy clouds. A sturdy spatula is your co-pilot for scraping down bowls and folding delicate mixtures. Measuring cups and spoons are, of course, non-negotiable for precision. Beyond that, a reliable blender or food processor can turn biscuits into crumbs in a flash, and a variety of attractive serving dishes, from elegant parfaits to springform pans, are crucial for presentation. Remember, presentation is half the delicious battle!
YourUltimate No Bake Dessert Guideto Key Ingredients
The beauty of no-bake desserts lies in their ingenious ingredient combinations. We’re talking about rich, creamy textures, vibrant fresh flavors, and satisfying crunch, all without a single bake. Start with a solid base: crushed digestive biscuits, graham crackers, or even gluten-free alternatives create perfect crusts. For creaminess, think full-fat cream cheese, luscious whipped coconut cream, or rich dairy cream. Fresh fruits like berries, mangoes, or kiwi add bursts of natural sweetness and color. Chocolates, cocoa powder, and nut butters provide depth and indulgence. And for that essential set, plant-based gelling agents like agar-agar or even the natural pectin in fruits can work wonders, ensuring your creation holds its shape like a dream. No agar-agar required!
Crafting Your First Masterpiece: Luscious Berry Delight Parfait
Ready to dive into the delightful world of chilled desserts? Let’s start with a vibrant and utterly irresistible Luscious Berry Delight Parfait. This recipe is a fantastic entry point into no-bake creations, showcasing how simple ingredients can come together for a stunning and incredibly satisfying treat. It’s layered perfection in a glass, combining creamy indulgence with the fresh tang of berries and a delightful crunch. This particular treat exemplifies the ease and elegance found throughout an ultimate no-bake dessert guide.
Luscious Berry Delight Parfait: Ingredients You’ll Need
- 1 cup (approx. 150g) digestive biscuits or graham crackers, crushed
- 1/4 cup (50g) unsalted butter, melted (dairy or plant-based)
- 16 oz (450g) full-fat cream cheese, softened
- 1 cup (240ml) heavy whipping cream or full-fat coconut cream (chilled)
- 1/2 cup (100g) granulated sugar
- 1 teaspoon vanilla bean paste
- 2 cups mixed fresh berries (strawberries, blueberries, raspberries)
- Optional: 1 tablespoon lemon juice
Step-by-Step Assembly for Your Parfait
- In a bowl, combine the crushed biscuits with melted butter until well mixed. Press a thin layer into the bottom of four individual serving glasses or jars. Place in the refrigerator to chill for at least 15 minutes.
- In a large mixing bowl, beat the softened cream cheese and sugar until smooth and creamy. Stir in the vanilla bean paste.
- In a separate, chilled bowl, whip the heavy cream (or coconut cream) until stiff peaks form. Gently fold the whipped cream into the cream cheese mixture until just combined, being careful not to overmix.
- In another small bowl, gently mash about half of your fresh berries. If desired, stir in the lemon juice for an extra zing.
- Spoon half of the cream cheese mixture over the chilled biscuit base in each glass. Top with a layer of mashed berries, then the remaining cream cheese mixture.
- Finish with a generous topping of whole fresh berries.
- Refrigerate for at least 4 hours, or preferably overnight, to allow the parfait to set beautifully and flavors to meld.
Add Your Touch
The beauty of the “Ultimate No Bake Dessert Guide” is its adaptability. Swap mixed berries for sliced mango, peaches, or even a layer of passion fruit curd. Infuse the cream cheese layer with a hint of lemon zest, orange blossom water, or a touch of cardamom. Add a crunchy element like toasted coconut flakes, chopped nuts, or a drizzle of chocolate sauce just before serving. Personalize it to your heart’s content!
Storing & Reheating
Store your magnificent no-bake parfait covered tightly in the refrigerator for up to 3 days. For best results, add the final fresh berry topping just before serving to maintain its vibrant appearance. Do not attempt to “reheat” no-bake desserts; their delicate structure relies on cold temperatures. Enjoy them straight from the fridge for peak deliciousness and texture.
Tips for YourUltimate No Bake Dessert GuideSuccess
- For an extra smooth cream cheese layer, ensure your cream cheese is at room temperature before mixing. This prevents lumps and creates a wonderfully silky texture.
- Always chill your bowl and whisk before whipping cream (dairy or coconut). This helps the cream whip up faster and achieve stiffer, more stable peaks.
- Don’t rush the chilling time! A minimum of 4 hours, or preferably overnight, is crucial for your no-bake dessert to fully set and for flavors to deepen.
My friend once tasted my no-bake chocolate mousse, swearing I’d spent hours. The look on her face when I revealed its quick prep time was priceless. No-bake desserts always bring smiles and delightful surprises.
Beyond Parfaits: YourUltimate No Bake Dessert GuideContinues
While our Berry Delight Parfait is a star, the world of no-bake desserts is vast and exciting. Imagine rich, creamy no-bake cheesecakes with various fruit toppings or decadent chocolate ganaches, setting beautifully thanks to thoughtful refrigeration and the right ingredient ratios. There are delightful energy balls packed with nuts, dried fruits, and seeds, perfect for a guilt-free snack. Mousse recipes, from light lemon to intense chocolate, require nothing more than skillful whipping and patient chilling. And let’s not forget the classic icebox cakes, where layers of crisp biscuits soften into cake-like tenderness after a night in the fridge. Each type offers a unique texture and flavor profile, making this collection of recipes truly versatile.
Exploring these different categories opens up a universe of possibilities for your no-bake repertoire. You can whip up a batch of individual trifles, construct a towering layered cake that requires no oven heat, or even create delightful frozen treats like homemade ice cream sandwiches. The common thread is always the avoidance of intense heat and reliance on refrigeration to achieve that perfect set and delightful texture. It’s a creative playground for anyone who loves sweets but dreads the oven. With a little imagination, you can transform simple pantry staples into extraordinary desserts that look and taste like they came from a high-end patisserie, all thanks to your growing skills as an ultimate no-bake dessert guide aficionado.
The Joy of Effortless Indulgence: Why We Love No-Bake
There’s an undeniable charm to no-bake desserts. They symbolize ease, elegance, and instant gratification. They free you from the shackles of oven timers and the dreaded burnt edges, allowing you to focus on flavor combinations and stunning presentation. These desserts are often lighter and brighter, perfect for warmer weather or after a hearty meal, offering a refreshing end to any culinary experience. Plus, they’re typically forgiving, making them ideal for beginner cooks looking to impress without the stress. This comprehensive guide isn’t just about recipes; it’s about embracing a philosophy of simple, joyful creation.
Moreover, the vibrant colors of fresh fruits and the smooth textures of creams make no-bake desserts inherently photogenic. They are perfect for social media sharing, bringing a touch of gourmet flair to your online presence. Hosting a dinner party? A no-bake dessert can be prepped entirely in advance, leaving you free to enjoy your guests without last-minute kitchen panic. This freedom and flexibility are what truly set no-bake treats apart, making them a staple in modern kitchens and a favorite for anyone who appreciates convenience without compromising on taste. Truly, these easy-to-make sweets are a game-changer.
YourUltimate No Bake Dessert Guide: Frequently Asked Questions
How long do no-bake desserts typically last?
Most no-bake desserts, especially those containing fresh dairy or fruit, will last 2-3 days when stored properly in an airtight container in the refrigerator. Some denser, fruit-free options might last up to 5 days, always check for freshness.
Can I make no-bake desserts vegan?
Absolutely! Many no-bake recipes are easily adaptable for vegan diets. Substitute dairy cream cheese with plant-based alternatives, use full-fat coconut cream instead of heavy whipping cream, and always opt for plant-based butters and biscuits. Plant-based gelling agents like agar-agar are also excellent for setting.
What if my no-bake dessert isn’t setting?
Common culprits include not enough chilling time, too much liquid, or insufficient gelling agent. Ensure you’re following the recipe’s chilling duration precisely. If using a gelling agent like agar-agar, double-check the quantity and ensure it was fully dissolved and incorporated. Patience is key when creating these delightful chilled treats!
Are no-bake desserts healthier than baked ones?
Not necessarily. While they might contain more fresh fruit, many no-bake desserts can still be rich in sugar and fats. It depends heavily on the ingredients used. However, you often have more control over ingredient quality and quantity, making it easier to opt for healthier swaps like natural sweeteners or less refined ingredients, which is a big advantage.
Embrace theUltimate No Bake Dessert GuideLifestyle
And there you have it – your comprehensive pathway to becoming an expert in effortless sweet creations! From understanding the fundamental principles to crafting your very own layered parfaits, you now possess the knowledge and confidence to whip up stunning desserts without ever touching an oven dial. Embrace the simplicity, savor the flavors, and revel in the sheer joy of creating something truly delicious and impressive with minimal effort. Go forth, chill out, and enjoy the sweet rewards of the no-bake life, sharing these incredible treats with everyone!
Conclusion for Ultimate No Bake Dessert Guide
Embarking on the ultimate no bake dessert guide adventure truly revolutionizes how we approach sweet treats. We’ve discovered that incredible flavors, sophisticated textures, and delightful presentations are entirely achievable without ever heating an oven. From understanding the crucial role of chilling time to mastering clever ingredient swaps, this guide equips you with the knowledge to craft show-stopping desserts with minimal fuss. Embrace the joy of effortless entertaining and spontaneous indulgence, proving that sometimes, the best things in life (and in dessert!) require no baking at all. So go ahead, unleash your inner dessert maestro and create some no-bake magic!
Print
Ultimate No Bake Dessert Guide
Unlock effortless dessert bliss! This Ultimate No Bake Guide creates a luscious, tangy cream cheese filling over a crunchy graham crust. Perfect for any occasion.
- Total Time: 35 minutes
- Yield: 4 servings
Ingredients
- Graham Cracker CrumbsThese form the crunchy foundation of our dessert, providing a delightful texture contrast. Choose plain crumbs or a subtly flavored variety for the best base.
- Unsalted ButterMelted butter binds the graham cracker crumbs together, creating a sturdy yet tender crust without any baking required. Make sure it's unsalted to control the overall sweetness.
- Cream CheeseThe star of our creamy filling, full-fat cream cheese provides a rich, tangy base that sets beautifully when chilled. Ensure it’s softened to room temperature for a smooth mixture.
- Sweetened Condensed MilkThis ingredient adds a luscious sweetness and helps to thicken our filling to the perfect consistency. It’s crucial for achieving that signature no-bake texture.
- Fresh Lemon JuiceA squeeze of fresh lemon juice brightens the entire dessert, cutting through the richness and enhancing the berry flavors. Always opt for fresh over bottled for superior taste.
- Vanilla Bean PasteJust a splash of good quality vanilla bean paste adds a warm, aromatic depth to the creamy filling. Pure vanilla bean paste is recommended for the best flavor.
- Heavy CreamWhipped to soft peaks, heavy cream provides an airy lightness and luxurious mouthfeel to the dessert. Ensure it is very cold before whipping for optimal volume.
- Mixed BerriesA medley of fresh berries, such as strawberries, blueberries, raspberries, and blackberries, offers bursts of natural sweetness and vibrant color. Wash and gently pat them dry before use.
Instructions
- Step 1: Prepare the Crumb CrustBegin by crushing your graham crackers into fine crumbs. A food processor makes this quick work, but a zip-top bag and a rolling pin work just as well, providing a therapeutic stress-reliever! In a medium bowl, combine the graham cracker crumbs with the melted unsalted butter. Mix thoroughly until the crumbs are evenly moistened, resembling wet sand. Press this mixture firmly into the bottom of individual serving glasses or a 9×13-inch dish. Use the back of a spoon or the bottom of a glass to compact it tightly. Place the crust in the refrigerator to chill while you prepare the filling. This initial chill helps the crust set properly and prevents it from crumbling too easily.Step 2: Create the Creamy FillingIn a large mixing bowl, beat the softened cream cheese until it’s light and fluffy, ensuring there are no lumps. This is key for a smooth, velvety texture. Gradually add the sweetened condensed milk, mixing until thoroughly combined. Stir in the fresh lemon juice and vanilla bean paste, blending until everything is incorporated and fragrant. In a separate, chilled bowl, whip the cold heavy cream until soft peaks form. Gently fold the whipped cream into the cream cheese mixture using a spatula, being careful not to deflate the air you’ve just incorporated. This folding technique ensures a light and airy filling.Step 3: Layer the DessertRetrieve your chilled crust. Spoon half of the creamy filling over the crust, spreading it evenly. Next, scatter about a third of your fresh mixed berries over this layer. Spoon the remaining cream cheese filling over the berries, spreading gently to cover them. Top with another generous layer of fresh berries, reserving a few for garnish. If using individual glasses, alternate layers of crust, filling, and berries until the glasses are full, ensuring the final layer is a vibrant burst of fruit. This creates an appealing visual and ensures every bite offers a medley of flavors.Step 4: Chill and ServeCover the assembled dessert loosely with plastic wrap and refrigerate for at least 4 hours, or ideally overnight. Chilling is essential as it allows the filling to firm up and the flavors to meld beautifully, transforming it from a collection of ingredients into a cohesive, delectable treat. Just before serving, add the reserved fresh berries as a final flourish.Transfer to plates or present the individual glasses, garnishing with extra berries and a mint sprig for the perfect finishing touch.Why Go No-Bake? The Ultimate Convenience FactorThe beauty of the no-bake dessert tradition isn't just about avoiding a hot oven on a sweltering day; it's about pure, unadulterated convenience wrapped in deliciousness. I remember countless times planning a dinner party, only to realize I'd completely forgotten about dessert until the last minute. Panic would set in, followed by the realization that my oven was already occupied with a roast, or simply that I didn't have the time to bake and cool something elaborate. That's when the no-bake revolution truly began for me. With anUltimate No Bake Dessert Guidelike this, you unlock a world where dessert is never an afterthought, but a breezy, stress-free delight. You save on energy, keep your kitchen cool, and still deliver a show-stopping sweet. It feels like cheating, but in the best possible way imaginable. The magic truly lies in the simplicity. There's no worrying about uneven baking, sunken centers, or over-browning. You mix, you chill, and you're done. This means more time enjoying your guests, your family, or simply indulging in a moment of peace, rather than frantically hovering over an oven door. For busy parents, hurried hosts, or anyone simply craving a quick reward, these desserts are a revelation. They prove that you don't need to be a pastry chef to create something truly memorable and utterly delicious. Embrace the cool side of dessert making, and your taste buds will thank you profusely.Crafting Your No-Bake Masterpiece: Tips and TricksAchieving no-bake perfection is less about magic and more about a few smart strategies. First, always ensure your cream cheese is truly at room temperature. Trying to beat cold cream cheese results in lumps, which no amount of mixing can completely smooth out later. So, plan ahead and take it out of the fridge at least an hour before you begin. Another vital tip involves chilling time. While 4 hours might seem like an eternity when a delicious dessert awaits, patience is truly a virtue here. The full chilling period allows the cream cheese mixture to firm up properly, preventing a runny or messy presentation. It also gives the flavors ample time to meld and deepen, transforming simple ingredients into a harmonious treat. When it comes to the heavy cream, make sure it’s ice-cold before whipping. Chilled cream whips up faster and holds its peaks better, providing that essential lightness to your filling. If your kitchen is warm, consider chilling your mixing bowl and whisk for 10-15 minutes beforehand. For the crust, don't be shy about pressing those crumbs down firmly. A well-compacted crust is a stable crust, ensuring your layers hold together beautifully. If you're using individual glasses, you can even use a small spice jar or the end of a wooden spoon to really get that base tight. Finally, for an extra touch of flavor and texture, consider toasting your graham cracker crumbs lightly in a dry pan for a few minutes before mixing them with butter; this deepens their nutty flavor profile significantly.Beyond the Berries: Creative Variations for Your No-Bake Dessert GuideWhile our Creamy Dream No-Bake Berry Delight is undeniably fantastic, the true beauty of following anUltimate No Bake Dessert Guideis the endless adaptability. You are the artist, and your kitchen is the canvas! Don’t feel limited by mixed berries. Imagine a tropical version featuring diced mango, pineapple, and passionfruit, perhaps with a hint of coconut extract in the cream cheese filling. Or how about a citrus explosion with segments of oranges, grapefruit, and lime zest? The bright, zesty notes would be incredibly refreshing. The crust is another area ripe for experimentation. Instead of graham crackers, try crushed vanilla wafers, chocolate sandwich cookies (cream removed), or even ginger snaps for a spicy kick. For an even richer base, a combination of crushed nuts and cookie crumbs can create a unique texture and flavor. And why stop at a single layer of fruit? You could swirl fruit purees into part of the cream cheese mixture for a marbled effect or add a thin layer of fruit jam between the creamy sections for an extra burst of concentrated flavor. A sprinkle of mini chocolate chips, shredded coconut, or chopped roasted nuts on top could add another layer of texture and visual appeal. The possibilities are truly as vast as your imagination, allowing you to tailor this treat to any season or craving.Storage Savvy: Keeping Your No-Bake Treats FreshOnce you’ve successfully whipped up your delightful no-bake dessert, the next logical question is how to keep it fresh and delicious. Proper storage is key to extending the life of your creation and ensuring every bite is as good as the first. This Creamy Dream No-Bake Berry Delight will keep beautifully in the refrigerator for up to 3-4 days when stored correctly. To store, simply cover the dish or individual serving glasses tightly with plastic wrap. This prevents the dessert from absorbing any unwanted odors from the refrigerator and, more importantly, keeps the creamy filling from drying out. If you’ve made the dessert in a larger dish, you can cut individual servings and store them in airtight containers for even better protection. While the dessert can be frozen, the texture of the cream cheese filling might change slightly upon thawing, potentially becoming a little grainy. The fresh berries will also likely soften considerably. If you do choose to freeze, ensure it’s well-wrapped in multiple layers of plastic wrap and then foil, and consume within a month for best quality. Thaw overnight in the refrigerator before serving. For optimal enjoyment, it’s always best consumed within the first few days, allowing the flavors to remain vibrant and the textures perfectly balanced.Can I use different fruits for this Ultimate No Bake Dessert Guide recipe?Yes, absolutely! This is anUltimate No Bake Dessert Guidethat encourages creativity. Feel free to substitute the mixed berries with any fresh fruit you prefer. Sliced peaches, cherries, kiwi, or even a mix of tropical fruits like mango and pineapple would be delightful. Just ensure your chosen fruits are ripe and not overly watery.How long does this dessert need to chill?For the best results, this dessert needs to chill in the refrigerator for a minimum of 4 hours. However, chilling it overnight is highly recommended as it allows the filling to firm up completely and the flavors to fully meld together, enhancing the overall taste and texture.Can I prepare this recipe ahead of time?Yes, this is an excellent make-ahead dessert! You can prepare the entire Creamy Dream No-Bake Berry Delight up to 1-2 days in advance. Just be sure to cover it tightly with plastic wrap and store it in the refrigerator. Add any final fresh berry garnishes right before serving.What can I use if I don't have graham cracker crumbs?If you don't have graham cracker crumbs, you can easily substitute them with other crushed cookies. Vanilla wafers, digestive biscuits, shortbread cookies, or even plain chocolate cookies (without the cream) work wonderfully to create a delicious and stable no-bake crust.Is this dessert suitable for a large gathering?Absolutely! This dessert is perfectly suited for large gatherings. You can easily double the recipe and prepare it in a larger pan or individual servings, making it a convenient and crowd-pleasing option that requires no last-minute oven fuss. So there you have it, your passport to a world of delectable desserts that defy the need for an oven. This Creamy Dream No-Bake Berry Delight is just the beginning of your journey into effortless sweetness. Go forth, chill, and conquer your dessert cravings with confidence and a knowing wink to your underutilized oven!
- Step 1: Prepare the Crumb Crust
- Step 2: Create the Creamy Filling
- Step 3: Layer the Dessert
- Step 4: Chill and Serve
Notes
- Keep your no-bake delight fresh by covering it tightly with plastic wrap or storing individual servings in airtight containers in the refrigerator for up to 3-4 days; this keeps it vibrant and prevents drying out.
- This dessert is designed to be served chilled, so skip any thoughts of reheating; simply pull it from the fridge when you're ready to enjoy its cool, creamy goodness.
- Elevate your presentation by garnishing individual servings with those last fresh berries and a sprig of mint right before guests arrive, creating a truly irresistible visual.
- For an unexpected depth of flavor in your crust, lightly toast your graham cracker crumbs in a dry pan for a few minutes before mixing with butter; it brings out a wonderful nutty aroma.
- Prep Time: 15 minutes
- Cook Time: 20 minutes
- Method: Stovetop
- Cuisine: American
Nutrition
- Serving Size: 1 slice (approx. 1/12 of 9-inch pie)
- Calories: 420
- Sodium: 290mg
- Fat: 29g
- Saturated Fat: 19g
- Trans Fat: 0.5g
- Protein: 48g
FAQs
What makes an Ultimate No Bake Dessert Guide so appealing for busy home cooks?
Busy home cooks often juggle numerous tasks, making elaborate baking projects a daunting prospect. An ultimate no bake dessert guide offers a treasure trove of recipes that deliver incredible flavor and presentation without ever needing to touch the oven. This means less cleanup, less time spent monitoring temperatures, and more precious moments free to enjoy with loved ones. Imagine whipping up a show-stopping cheesecake or a luscious chocolate mousse in a fraction of the time, all while maintaining your cool. It’s the perfect solution for spontaneous cravings or last-minute entertaining, truly simplifying the dessert-making process.
Are there common pitfalls to avoid when embarking on an Ultimate No Bake Dessert Guide journey?
Indeed, even the simplest no-bake creations have their quirks! A common pitfall is not allowing enough chilling time; patience is truly a virtue here, as adequate refrigeration is crucial for setting and achieving the perfect texture. Another mistake can be incorrect ingredient measurements, especially with gelling agents like agar-agar, which require precision for the right consistency. Also, be mindful of moisture content in your base, as too much liquid can lead to a soggy foundation. Following your ultimate no bake dessert guide recipes closely and trusting the process will help you avoid these little culinary traps and ensure sweet success every time.
Can you really achieve sophisticated flavors and textures with just an Ultimate No Bake Dessert Guide?
Absolutely! Don’t let the simplicity of “no-bake” fool you into thinking the results are anything less than extraordinary. An ultimate no bake dessert guide empowers you to craft desserts with layers of complex flavors and incredibly varied textures. Think velvety custards, rich chocolate ganaches, crunchy cookie crusts, and delicate fruit mousses, all without baking. The secret lies in quality ingredients and clever techniques, like whipping creams to perfection, infusing flavors, or utilizing plant-based gelling agents to create stability. You’ll be amazed at the gourmet-level desserts you can produce, impressing everyone with minimal effort and maximum deliciousness.
What innovative ingredient swaps can elevate my no-bake creations from good to gourmet?
To truly elevate your no-bake desserts, consider some exciting ingredient swaps that introduce new dimensions of flavor and texture. Instead of plain vanilla wafers, try using crushed spiced cookies or gluten-free alternatives for a unique base. For creamy elements, explore coconut cream, cashew butter, or even avocado for a healthier fat profile and distinct richness. Experiment with different types of fruit purees – mango, passionfruit, or tart berries – to brighten your desserts. A dash of rosewater or orange blossom water can add an exotic floral note, transforming simple recipes into something truly special and unforgettable for your guests.

Leave a Comment