
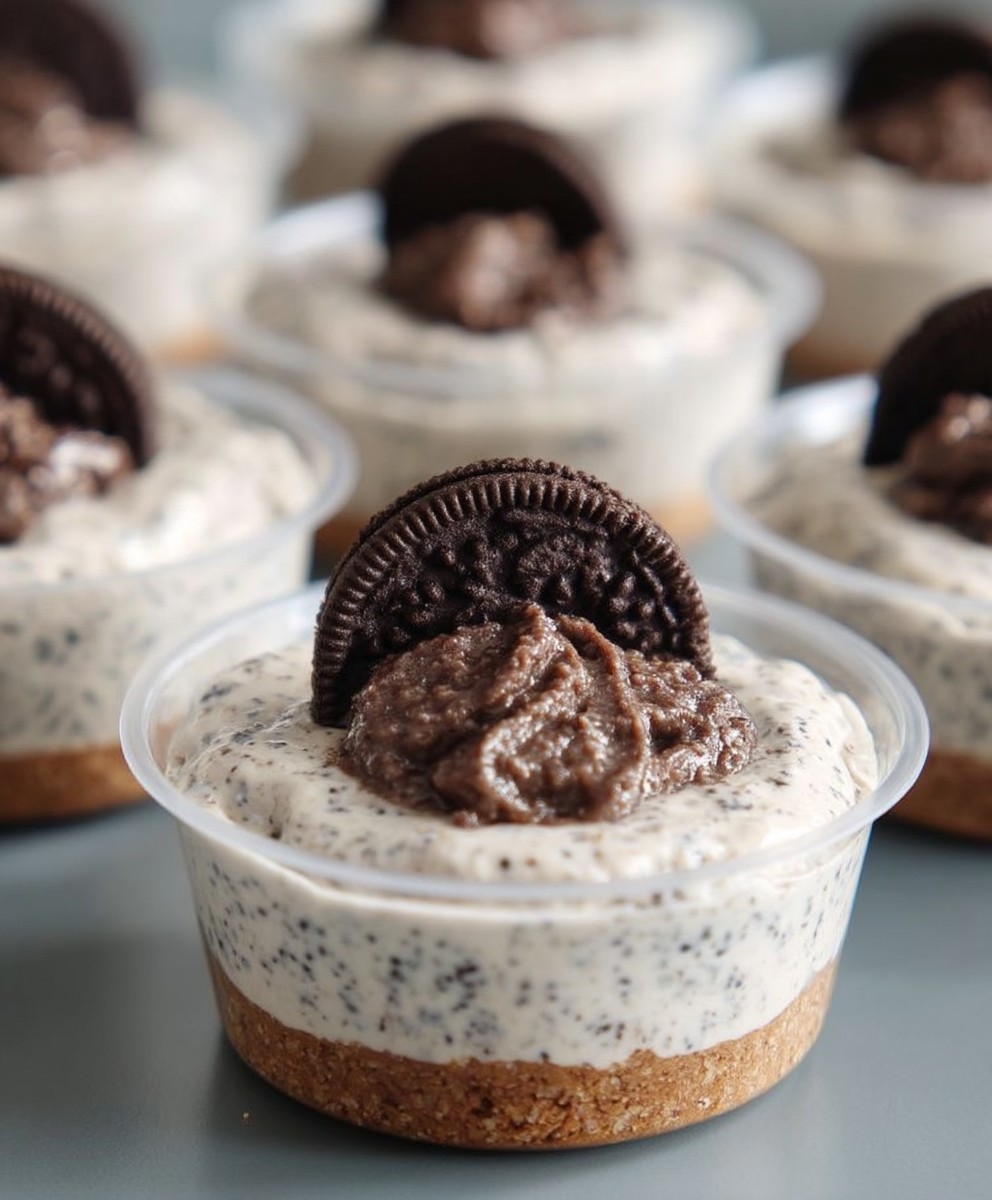
Cookies and Cream Dessert Cups
Cookies and Cream Dessert Cups are a delightful treat that brings a smile to anyone’s face. Imagine creamy layers of rich chocolate and vanilla, all topped with crunchy cookie crumbles. This dessert not only satisfies your sweet tooth but also evokes a sense of nostalgia, reminding many of childhood favorites. The combination of flavors and textures makes these dessert cups a beloved choice for gatherings, parties, or simply a cozy night in.
Originating from the classic cookies and cream ice cream flavor, this dessert has evolved into a versatile treat that can be enjoyed in various forms. People love these dessert cups for their convenience; they are easy to prepare and can be made ahead of time, allowing you to spend more time with your guests. The creamy filling paired with the crunch of cookies creates a perfect balance that is hard to resist. Whether you’re hosting a dinner party or just indulging yourself, Cookies and Cream Dessert Cups are sure to impress!
Ingredients:
- 1 package (8 oz) cream cheese, softened
- 1 cup powdered sugar
- 1 teaspoon vanilla extract
- 1 cup heavy whipping cream
- 1 package (15.25 oz) Oreo cookies, crushed
- 1 cup chocolate pudding mix
- 2 cups milk
- Extra Oreo cookies for garnish
Preparing the Cream Cheese Mixture
- In a large mixing bowl, add the softened cream cheese. Using an electric mixer, beat the cream cheese on medium speed until it becomes smooth and creamy, about 2-3 minutes.
- Gradually add the powdered sugar to the cream cheese, mixing on low speed until combined. Once incorporated, increase the speed to medium and mix for an additional minute.
- Add the vanilla extract to the mixture and beat until fully combined. Scrape down the sides of the bowl as needed to ensure everything is well mixed.
Whipping the Cream
- In a separate bowl, pour in the heavy whipping cream. Using a clean electric mixer, beat the cream on medium-high speed until soft peaks form, about 3-5 minutes.
- Once soft peaks have formed, gently fold the whipped cream into the cream cheese mixture. Use a spatula to carefully combine the two mixtures, being cautious not to deflate the whipped cream.
Preparing the Chocolate Pudding
- In another bowl, combine the chocolate pudding mix with the milk. Whisk together until the mixture is smooth and begins to thicken, about 2 minutes.
- Let the pudding sit for about 5 minutes to fully set. This will ensure a nice, thick consistency for layering in the dessert cups.
Assembling the Dessert Cups
- Start by taking your crushed Oreo cookies and divide them evenly among the bottom of your dessert cups. You can use small glasses, mason jars, or any cup of your choice.
- Next, spoon a layer of the cream cheese mixture over the crushed Oreos, filling each cup about halfway.
- After that, add a layer of the chocolate pudding on top of the cream cheese mixture, filling the cups to about three-quarters full.
- Repeat the layers by adding another layer of crushed Oreos, followed by the remaining cream cheese mixture, and then finish with a final layer of chocolate pudding.
Garnishing the Dessert Cups
- To finish off the dessert cups, take the extra Oreo cookies and crush them into smaller pieces. Sprinkle these crushed cookies generously on top of each dessert cup for added texture and flavor.
- If desired, you can also add a dollop of whipped cream on top of each cup for an extra touch of indulgence.
- For a decorative touch, you can place a whole Oreo cookie on top of each dessert cup as a garnish.
Chilling the Dessert
- Once all the cups are assembled and garnished, cover them with plastic wrap or a lid to prevent any odors from the fridge from affecting the dessert.
- Place the dessert cups in the refrigerator and let them chill for at least 2 hours. This chilling time allows the flavors to meld together and the dessert to set properly.
Serving the Dessert Cups
- After the chilling period, remove the dessert cups from the refrigerator. They should be firm and ready to serve.
- Serve the dessert cups cold, and enjoy the delightful layers of cream cheese, chocolate pudding, and crushed Oreos.
- These dessert cups are perfect for parties, gatherings, or simply as a sweet treat to enjoy at home!
Tips for Success:
- Make sure the cream cheese is softened to room temperature for easier mixing.
- For a richer flavor, you can use double-stuffed Oreos instead of regular ones.
- Feel free to customize the layers by adding other ingredients like chocolate chips or whipped cream between the layers.
Conclusion:
In conclusion, these Cookies and Cream Dessert Cups are an absolute must-try for anyone looking to indulge in a delightful treat that combines the rich flavors of chocolate and cream. The layers of creamy filling, crunchy cookie bits, and whipped topping create a harmonious blend that is sure to satisfy your sweet tooth. Whether you’re hosting a party, celebrating a special occasion, or simply treating yourself after a long day, these dessert cups are the perfect choice.
One of the best things about this recipe is its versatility. You can easily customize the dessert cups to suit your taste or dietary preferences. For a fun twist, consider adding a layer of your favorite fruit, such as strawberries or raspberries, to introduce a fresh element that complements the rich cookies and cream flavor. Alternatively, you could swap out the classic chocolate sandwich cookies for a different variety, like peanut butter or mint-flavored cookies, to create a unique spin on this classic dessert.
If you’re looking to make these dessert cups even more decadent, try drizzling some chocolate or caramel sauce on top before serving. You can also sprinkle some crushed cookies or chocolate shavings for an extra touch of elegance. These serving suggestions not only enhance the visual appeal but also elevate the overall flavor experience, making each bite even more enjoyable.
I encourage you to give this Cookies and Cream Dessert Cups recipe a try. It’s simple enough for even novice bakers to master, yet impressive enough to wow your friends and family. Once you’ve made them, don’t forget to share your experience! I would love to hear how your dessert cups turned out and any creative variations you tried. You can share your thoughts in the comments below or tag me on social media with your delicious creations. Your feedback not only inspires me but also helps others discover the joy of making these delightful dessert cups.
So, gather your ingredients, roll up your sleeves, and get ready to whip up a batch of these irresistible Cookies and Cream Dessert Cups. Trust me, once you take that first spoonful, you’ll understand why this recipe is destined to become a favorite in your household. Happy baking!
Cookies and Cream Dessert Cups: A Deliciously Easy Recipe
Enjoy these delicious Oreo Dessert Cups, featuring layers of creamy cheesecake, rich chocolate pudding, and crunchy crushed Oreos. Perfect for any occasion, these sweet treats are sure to delight everyone!
Ingredients
- 1 package (8 oz) cream cheese, softened
- 1 cup powdered sugar
- 1 teaspoon vanilla extract
- 1 cup heavy whipping cream
- 1 package (15.25 oz) Oreo cookies, crushed
- 1 cup chocolate pudding mix
- 2 cups milk
- Extra Oreo cookies for garnish
Instructions
- In einer großen Schüssel die weiche Frischkäse hinzufügen. Mit einem elektrischen Mixer den Frischkäse bei mittlerer Geschwindigkeit 2-3 Minuten lang schlagen, bis er glatt und cremig ist.
- Den Puderzucker nach und nach zum Frischkäse hinzufügen und bei niedriger Geschwindigkeit vermengen. Sobald alles gut vermischt ist, die Geschwindigkeit auf mittel erhöhen und eine weitere Minute mixen.
- Den Vanilleextrakt zur Mischung hinzufügen und schlagen, bis alles gut vermischt ist. Gegebenenfalls die Seiten der Schüssel abkratzen, um sicherzustellen, dass alles gut vermischt ist.
- In einer separaten Schüssel die Schlagsahne einfüllen. Mit einem sauberen elektrischen Mixer die Sahne bei mittlerer bis hoher Geschwindigkeit 3-5 Minuten lang schlagen, bis sich weiche Spitzen bilden.
- Die geschlagene Sahne vorsichtig unter die Frischkäsemischung heben. Mit einem Spatel die beiden Mischungen vorsichtig kombinieren, um die geschlagene Sahne nicht zu entleeren.
- In einer anderen Schüssel das Schokoladenpuddingpulver mit der Milch vermengen. Alles gut verquirlen, bis die Mischung glatt ist und zu dick werden beginnt, etwa 2 Minuten.
- Den Pudding etwa 5 Minuten ruhen lassen, damit er vollständig fest wird. Dies sorgt für eine schöne, dicke Konsistenz zum Schichten in den Dessertbechern.
- Die zerdrückten Oreo-Kekse gleichmäßig auf den Boden der Dessertbecher verteilen. Kleine Gläser, Einmachgläser oder jede Tasse Ihrer Wahl verwenden.
- Eine Schicht der Frischkäsemischung über die zerdrückten Oreos löffeln, sodass jeder Becher etwa zur Hälfte gefüllt ist.
- Eine Schicht des Schokoladenpuddings auf die Frischkäsemischung geben, sodass die Becher zu etwa drei Vierteln gefüllt sind.
- Die Schichten wiederholen, indem eine weitere Schicht zerdrückter Oreos, gefolgt von der restlichen Frischkäsemischung, und schließlich eine letzte Schicht Schokoladenpudding hinzugefügt wird.
- Die extra Oreo-Kekse in kleinere Stücke zerdrücken und großzügig auf jedem Dessertbecher für zusätzliche Textur und Geschmack streuen.
- Falls gewünscht, können Sie auch einen Klecks Schlagsahne auf jeden Becher für einen zusätzlichen Hauch von Genuss hinzufügen.
- Für eine dekorative Note können Sie einen ganzen Oreo-Keks auf jeden Dessertbecher als Garnitur legen.
- Die Dessertbecher mit Frischhaltefolie oder einem Deckel abdecken, um zu verhindern, dass Gerüche aus dem Kühlschrank das Dessert beeinträchtigen.
- Die Dessertbecher in den Kühlschrank stellen und mindestens 2 Stunden kühlen. Diese Kühlzeit ermöglicht es den Aromen, sich zu verbinden und das Dessert richtig fest zu werden.
- Nach der Kühlzeit die Dessertbecher aus dem Kühlschrank nehmen. Sie sollten fest und servierbereit sein.
- Die Dessertbecher kalt servieren und die köstlichen Schichten aus Frischkäse, Schokoladenpudding und zerdrückten Oreos genießen.
- Diese Dessertbecher sind perfekt für Partys, Zusammenkünfte oder einfach als süße Leckerei zum Genießen zu Hause!
Notes
- Make sure the cream cheese is softened to room temperature for easier mixing.
- For a richer flavor, you can use double-stuffed Oreos instead of regular ones.
- Feel free to customize the layers by adding other ingredients like chocolate chips or whipped cream between the layers.


Leave a Comment