
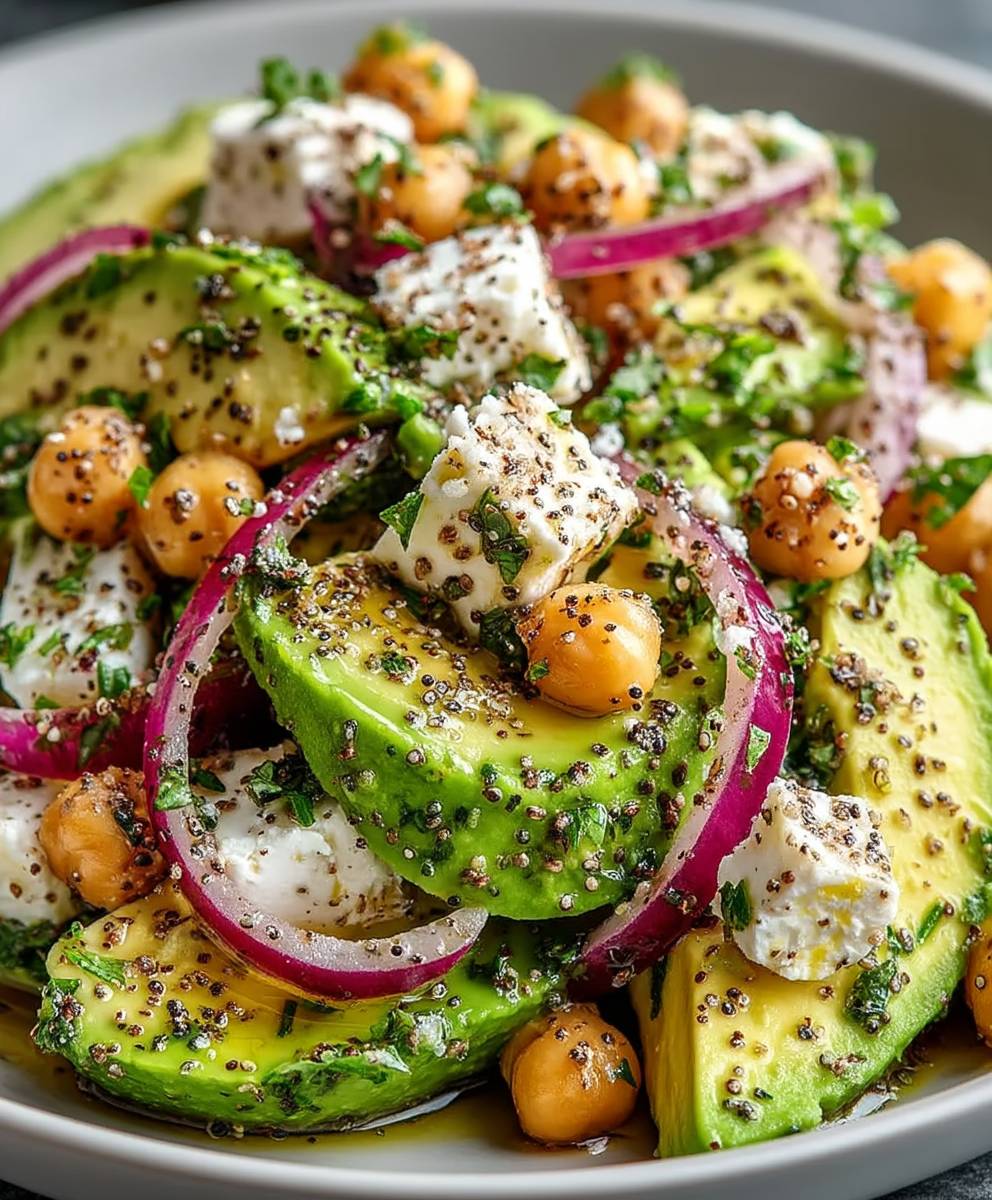
Chickpea feta avocado salad is a delightful dish that brings together vibrant flavors and wholesome ingredients, making it a favorite among health enthusiasts and food lovers alike. This refreshing salad not only tantalizes your taste buds but also offers a nutritious boost, perfect for any meal of the day. Originating from Mediterranean cuisine, the combination of chickpeas, feta cheese, and creamy avocado has become a staple in many households, celebrated for its rich textures and satisfying taste.
People adore this chickpea feta avocado salad for its versatility and convenience. It’s quick to prepare, making it an ideal choice for busy weeknights or a light lunch. The creamy avocado pairs beautifully with the salty feta, while the chickpeas add a hearty element that keeps you feeling full and energized. Whether you’re looking for a side dish or a main course, this salad is sure to impress with its colorful presentation and delicious flavor profile.
Ingredients:
- 1 can (15 oz) chickpeas, drained and rinsed
- 1 medium ripe avocado, diced
- 1 cup cherry tomatoes, halved
- 1 cucumber, diced
- 1/2 red onion, finely chopped
- 1/2 cup feta cheese, crumbled
- 1/4 cup fresh parsley, chopped
- 2 tablespoons olive oil
- 1 tablespoon lemon juice
- 1 teaspoon dried oregano
- Salt and pepper to taste
Preparing the Ingredients
- Chickpeas: Start by draining and rinsing the chickpeas under cold water. This helps to remove excess sodium and any canning liquid. Once rinsed, set them aside in a large mixing bowl.
- Avocado: Cut the avocado in half, remove the pit, and scoop the flesh out with a spoon. Dice the avocado into bite-sized pieces and add them to the bowl with the chickpeas.
- Cherry Tomatoes: Rinse the cherry tomatoes under cold water. Slice each tomato in half and add them to the mixing bowl.
- Cucumber: Peel the cucumber if desired, then cut it in half lengthwise and remove the seeds with a spoon. Dice the cucumber into small pieces and add them to the bowl.
- Red Onion: Peel the red onion and finely chop it. If you prefer a milder flavor, you can soak the chopped onion in cold water for about 10 minutes before adding it to the salad. This will help to reduce its sharpness.
- Feta Cheese: Crumble the feta cheese into small pieces. You can use pre-crumbled feta or crumble a block of feta cheese yourself. Add the feta to the mixing bowl.
- Fresh Parsley: Rinse the parsley under cold water, shake off excess water, and chop it finely. Add the chopped parsley to the bowl for a fresh flavor boost.
Making the Dressing
- Combine Ingredients: In a small bowl, combine the olive oil, lemon juice, dried oregano, salt, and pepper. Whisk together until well combined. This dressing will add a zesty flavor to the salad.
- Taste Test: Before adding the dressing to the salad, taste it and adjust the seasoning if necessary. You can add more lemon juice for acidity or more salt and pepper to enhance the flavors.
Assembling the Salad
- Combine Salad and Dressing: Pour the dressing over the chickpea and vegetable mixture in the large mixing bowl. Gently toss everything together using a spatula or large spoon. Be careful not to mash the avocado; you want to keep the pieces intact for texture.
- Chill (Optional): If you have time, cover the salad with plastic wrap and let it chill in the refrigerator for about 30 minutes. This allows the flavors to meld together beautifully.
- Final Touches: Before serving, give the salad another gentle toss. Taste it one last time to see if it needs any additional seasoning. You can sprinkle a little more feta on top for presentation.
Serving Suggestions
- Plate the Salad: Serve the salad in individual bowls or on a large platter. This salad is colorful and visually appealing, so don’t be shy about showcasing it!
- Pairing Options: This chickpea feta avocado salad pairs wonderfully with grilled chicken, fish, or as a side dish for barbecues. It can also be enjoyed on its own as a light lunch or dinner.
- Storage: If you have leftovers, store them in an airtight container in the refrigerator. The salad is best enjoyed within 1-2 days, as the avocado may brown over time.
Variations and Tips
- Protein Boost:
Conclusion:
In conclusion, this chickpea feta avocado salad is not just a dish; it’s a delightful experience that combines vibrant flavors and nutritious ingredients. The creamy avocado pairs beautifully with the salty feta, while the chickpeas add a hearty texture that makes this salad both satisfying and refreshing. Whether you’re looking for a quick lunch, a side dish for dinner, or a healthy snack, this salad is a must-try!
One of the best things about this chickpea feta avocado salad is its versatility. You can easily customize it to suit your taste preferences or dietary needs. For a bit of crunch, consider adding some toasted nuts or seeds, such as sunflower seeds or walnuts. If you want to spice things up, a sprinkle of red pepper flakes or a dash of hot sauce can elevate the flavor profile. You can also experiment with different herbs; fresh dill or parsley can add a lovely aromatic touch. For a heartier meal, try adding grilled chicken or shrimp, making it a complete protein-packed dish.
When it comes to serving suggestions, this salad shines as a standalone dish, but it also pairs wonderfully with grilled meats or fish. Serve it alongside a warm pita or some crusty bread for a delightful Mediterranean-inspired meal. You can even use it as a filling for wraps or sandwiches, making it a perfect option for meal prep or picnics.
I encourage you to give this chickpea feta avocado salad a try! It’s not only easy to prepare but also a fantastic way to incorporate more plant-based ingredients into your diet. Plus, it’s a great dish to share with friends and family. I would love to hear about your experience! Did you make any variations? What did you think of the flavors? Please share your thoughts and any creative twists you added in the comments below. Your feedback not only inspires me but also helps others discover new ways to enjoy this delicious salad.
So, gather your ingredients, and let’s get mixing! I promise you won’t regret trying this chickpea feta avocado salad. It’s a dish that’s sure to impress and satisfy, making it a staple in your recipe collection. Happy cooking!
Chickpea Feta Avocado Salad: A Healthy and Delicious Recipe
A delicious and easy-to-make dish that combines fresh ingredients and bold flavors, perfect for any occasion. Enjoy a satisfying meal that is both nutritious and delightful!
Ingredients
- 500 g Mehl (Type 550)
- 10 g Salz
- 5 g Trockenhefe
- 350 ml Wasser
- 3 Zehen Knoblauch, gehackt
- 2 EL Olivenöl
Instructions
- In einer großen Schüssel Mehl, Salz und Hefe vermengen.
- Wasser hinzufügen und zu einem Teig verrühren.
- Knoblauch und Olivenöl unterrühren.
- Teig 12 Stunden gehen lassen.
Notes
- Der Teig darf während der Ruhezeit nicht bewegt werden.
- Für ein intensiveres Knoblaucharoma können mehr Zehen verwendet werden.


Leave a Comment