
Remember the sticky, smoky mess of true campfire s’mores? They are glorious, messy torture, guaranteed to leave you smelling like wood smoke and despairing over molten marshmallow strings. Now, imagine that perfect gooey chocolate-marshmallow center encased in flaky, buttery pastry. This is where the magic of these Buttery S’Mores Hand Pies: A Deliciously Easy Recipe comes in—pure nostalgia, minus the burned eyebrows.
We’ve taken that beloved campfire classic, cleaned up its act, and wrapped it in a portable golden package, perfect for snacking without the need for a fire pit or industrial-sized wet wipes. Get ready for a dessert that delivers maximum flavor with minimal effort.
- Utilizes store-bought pastry for quick assembly, making complicated baking simple and accessible for nearly all skill levels and busy schedules.
- Delivers the classic combination of smoky graham cracker crumbs, rich melted chocolate, and sweet toasted marshmallow fluff in every single bite.
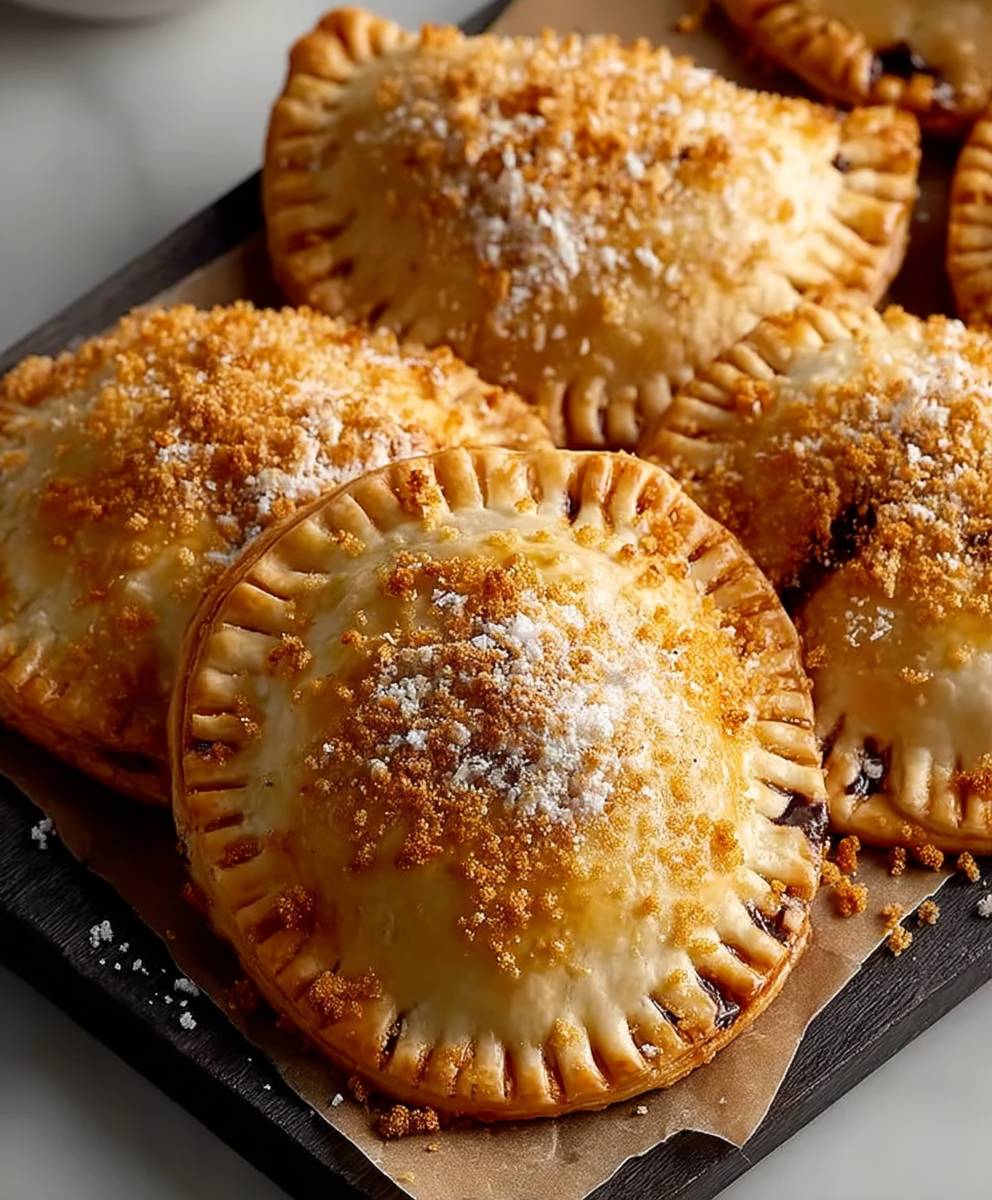
- These miniature, crimped pies feature a gorgeous golden, flaky crust and a perfectly gooey center that always drips delightfully when served warm.
- Ideal for road trips, school lunch desserts, or backyard gatherings when a proper roaring campfire simply is not a practical option.
Why Hand Pies Win the Dessert Battle Every Time
There is an unspoken rule about traditional s’mores: 90% of the joy comes from the anticipation, and 10% comes from the execution. The actual eating part usually involves the structural failure of the graham cracker, the loss of half your marshmallow to the flames, and a chocolate bar that refuses to melt evenly. We deserve better. We deserve s’mores engineered for success, portability, and structural integrity. This is the moment when the hand pie steps forward, wearing a hero cape made of butter and flour.
A hand pie isn’t just a pastry; it’s a commitment to convenience. By enclosing the messy filling—the graham crumb mixture, the chocolate, and the marshmallow—we lock in the flavor and eliminate the inherent tragedy of the sticky dessert meltdown. Think of it as advanced dessert delivery. You get all the essential smoky, sweet notes without needing a ten-minute cleanup operation afterward. Plus, they look infinitely more sophisticated than a slab of melted chocolate fighting a scorched marshmallow.
For those of us who appreciate efficiency, the foundation of this recipe relies on quality ingredients combined with simple techniques. We aren’t making puff pastry from scratch today; we are focusing on the filling and the flawless finish. The key to capturing that authentic campfire depth lies in treating the graham crackers not just as a carrier, but as a critical flavor component, ensuring their distinct sweetness is woven into the very fabric of the filling.
The Essential Technique: Incorporating Graham Cracker Dust
The biggest mistake amateur s’mores creators make is relying solely on the structural integrity of two dry crackers. When you bake these portable treats, you need the graham flavor inside the pie, not just framing it. Our secret involves pulverizing the crackers into fine crumbs and mixing them with melted butter and a touch of brown sugar. This mixture serves two purposes: first, it mimics the flavor profile of the slightly smoky, toasted graham, and second, it absorbs some of the marshmallow seepage during the baking process, preventing a catastrophic filling breach.
Achieving the ideal texture for the graham crumb mixture is crucial. It shouldn’t be a paste, but a moist, sandy texture. You want it packed just enough to offer resistance when you bite into the pie, contrasting beautifully with the light, airy marshmallow. This focused attention to texture is what transforms a simple pastry pocket into a truly cohesive and impressive dessert that tastes exactly like a campfire s’more should.
Remember that baking is essentially controlled chemistry, and in this specific case, we are optimizing the heat transfer. The filling needs to get hot enough for the chocolate to melt completely and the marshmallow to turn gooey and lightly toasted, all while the pastry remains flaky and golden brown. Proper distribution of the filling within the pastry square is the final key to ensuring every bite delivers the perfect ratio of crust to ooze.
Ingredients for Buttery S’Mores Hand Pies: A Deliciously Easy Recipe
Here’s what you’ll need to make this delicious dish:
- Ready-Made Pie Crust or Puff PastrySelect a high-quality, all-butter variety if possible, ensuring it is chilled until ready to use for maximum flakiness.
- Mini MarshmallowsThese are preferred over large marshmallows because they melt faster and distribute more evenly across the smaller surface area of the hand pie.
- Milk or Dark Chocolate BarsChoose a high-quality chocolate that melts smoothly, avoiding overly thin or heavily processed chips which contain stabilizers that prevent a creamy melt.
- Graham CrackersYou will need about one sleeve of crackers, which must be finely crushed to create the essential crumb base for the filling.
- Unsalted ButterThis is melted and mixed with the graham crumbs and brown sugar to form a cohesive, flavorful paste that anchors the interior filling.
- Light Brown SugarA small amount adds depth and molasses notes to the graham mixture, enhancing the perceived smokiness of the s’mores flavor profile.
- One Large EggThis is whisked with a splash of water to create the essential egg wash, which promotes a deep golden color and helps seal the pie edges securely.
The full ingredients list, including measurements, is provided in the recipe card directly below.
How to Make Buttery S’Mores Hand Pies: A Deliciously Easy Recipe
Follow these simple steps to prepare this delicious dish:
Step 1: Prepare the Pastry and Crumb Base
Preheat your oven to 400°F (200°C). Line two large baking sheets with parchment paper. If using refrigerated pie dough, roll it out gently on a lightly floured surface. Use a sharp knife or a pizza cutter to divide the dough into 8 equal squares, approximately 4×4 inches each. Next, in a small bowl, combine the finely crushed graham crumbs, melted butter, and brown sugar until the mixture resembles damp sand. Set the pastry squares and crumb mixture aside.
Step 2: Assemble the Bottom Layer
Working quickly to keep the dough cold, take four of the pastry squares and spread a generous spoonful of the graham crumb mixture across the center of each square, leaving a clear half-inch border around the edges for sealing. Press the crumb mixture down gently to compress it slightly. Place a few squares of chocolate directly on top of the crumb mixture. The chocolate acts as a barrier and melts beautifully when baked.
Step 3: Add the Marshmallow Layer
Carefully layer a small mound of mini marshmallows (about 12 to 15) on top of the chocolate layer on each of the four filled squares. Do not overfill the squares, as the marshmallows will expand significantly during baking. The goal is to maximize gooiness without causing an explosive mess inside the oven. Remember, moderation in filling guarantees structural success.
Step 4: Seal and Crimp the Hand Pies
Take the remaining four empty pastry squares and place them carefully on top of the filled squares, aligning the edges perfectly. Use the tines of a fork to firmly press and crimp the edges closed all the way around the perimeter, ensuring a tight seal to prevent any filling leakage. Once sealed, use a small, sharp knife to cut three tiny slits in the top of each pie; this allows steam to escape and ensures the pastry remains flaky.
Step 5: Apply the Egg Wash and Bake
In a tiny bowl, whisk the egg with a tablespoon of water to create a smooth egg wash. Brush the top of each crimped hand pie lightly with the egg wash; this step gives the pies their characteristic golden, glossy finish. Transfer the pies to the prepared baking sheets and bake for 15 to 18 minutes, or until the pastry is puffed and beautifully golden brown. Keep a close eye on the marshmallows through the steam vents; you want them to bubble lightly.
Step 6: Cool and Serve Warm
Once baked, carefully remove the pies from the oven. Let the Buttery S’Mores Hand Pies: A Deliciously Easy Recipe cool on the baking sheet for at least 10 minutes. This mandatory cooling period allows the molten chocolate and marshmallow to set slightly, preventing them from oozing out entirely when you take the first bite. If you skip this step, you risk severe palate damage from the hot filling. Transfer to plates and perhaps dust them lightly with powdered sugar for the perfect finishing touch. These are best served warm, ideally with a tall glass of cold milk.
Tips for Achieving Peak Pie Flakiness
Flaky pastry is the cornerstone of any great hand pie, providing that satisfying, textural crunch before you hit the gooey interior. The biggest factor in achieving flakiness is temperature. Always ensure your pastry dough is thoroughly chilled before rolling, cutting, and especially before placing it in the oven. When cold dough hits a hot oven, the fat rapidly steams, creating those desired pockets of air. If the dough gets warm while you are assembling the Buttery S’Mores Hand Pies: A Deliciously Easy Recipe, pop them back into the refrigerator for 15 minutes before the final egg wash and bake. Never rush the chilling process.
Mastering the Crimping Technique
The crimping process isn’t just about aesthetics; it is the structural engineering that keeps the magnificent marshmallow goo locked safely inside. When you press the fork tines into the edge of the pastry, you must press down firmly enough to fuse the top and bottom layers of the dough. However, be cautious not to tear the dough itself. If the pastry seems too dry to seal properly, you can very lightly dampen the edges with a tiny bit of water or egg wash before placing the top square on. A tight seal prevents filling leaks, which can burn on the baking sheet and cause the pie to stick.
Chocolate Selection Matters
While the focus is often on the marshmallow, the chocolate is the rich counterpoint that prevents this dessert from being cloyingly sweet. We recommend using good-quality milk or dark chocolate bars that contain a higher cocoa butter percentage and fewer stabilizers. Standard chocolate chips often retain their shape even when hot due to added ingredients designed to keep them chip-shaped. For that beautiful, liquid, molten river effect, break up a good baking bar into small squares or use high-quality chocolate discs. This ensures the chocolate melts into a beautiful, silky layer that coats the graham crumbs perfectly.
Storage and Reheating Suggestions
These hand pies are undeniably best enjoyed fresh from the oven, but leftovers are certainly possible. Once cooled completely, store the hand pies in an airtight container at room temperature for up to three days. If you need a longer storage solution, you can freeze unbaked pies after Step 4, placing them on a baking sheet until solid, then transferring them to a freezer bag for up to two months. When you are ready to enjoy them again, the best way to reheat already-baked pies is in a toaster oven or a standard oven at 300°F (150°C) for about five to seven minutes. This helps re-crisp the pastry without drying out the filling. Never use a microwave, as it will make the crust soggy.
The Accidental Discovery of Sunshine on a Plate

It was a rainy Tuesday, far too damp for a bonfire. I was desperately craving that gooey, campfire nostalgia. Necessity is the mother of invention—or maybe it was just sheer laziness—but folding those classic ingredients into flaky, buttery pastry instantly captured sunshine on a dreary afternoon.
There is something inherently joyful about a s’more. It’s the official dessert of sticky fingers, smoky clothes, and questionable life choices made under the moonlight. But let’s be honest: not every day is suitable for chasing down a roaring fire pit. Sometimes, you need that perfect combination of toasted marshmallow, melted chocolate, and crunchy graham cracker delivered directly to your couch, free from environmental hazards and mosquito bites. That is precisely where the concept of the hand pie swooped in, dressed in a golden, flaky crust, ready to save dessert.
When I first attempted this recipe, I confess I used store-bought refrigerated pie crust and called it a day. Why? Because the goal wasn’t to prove my mastery of laminated dough; the goal was speed and maximum immediate gratification. These Buttery S’Mores Hand Pies are the perfect collision of convenience and decadence, offering all the delightful messiness of the original classic, neatly sealed in a portable pocket of absolute buttery perfection. They look impressive enough for a dinner party, but they are deceptively simple to assemble, which means you can definitely enjoy one (or three) whenever a deep, primal craving for campfire goodness strikes.
Why Hand Pies Beat the Campfire Mess
Think about the traditional s’more experience. It requires a specific temperature, precise rotation of the stick, and usually results in either a marshmallow that is still cold in the middle or one that has burst into glorious, terrifying flames. The hand pie eliminates these variables. Here, we achieve the perfect melt via the oven, giving you controlled, consistent results every time. Plus, let’s face it, no one wants molten chocolate dripping down their elbow when they are wearing their favorite sweater.
The Magic Behind the Flaky Crust
The foundation of any great hand pie is, naturally, the crust. We are aiming for maximum flakiness and a deep, golden hue. Since we are focusing on ease, using a quality pre-made crust or puff pastry works wonders, saving you hours of chilling and rolling. The secret to transforming this basic base into something truly spectacular is twofold: high-quality butter in the dough (if making from scratch) and a dazzling egg wash applied just before baking. This gives the Buttery S’Mores Hand Pies that enviable sheen and satisfying crunch when you bite into them, preparing your taste buds for the gooey avalanche inside.
Gathering Your Supplies for Ultimate Comfort
While this recipe might seem complex due to its sheer deliciousness, the ingredient list is remarkably short. We are sticking to the classics and only making slight adjustments to ensure they behave properly inside a pastry pocket rather than over a flame. Trust me, the ratios here are perfected to give you maximum filling without risking a tragic structural collapse during the oven phase.
Ingredients List for Buttery S’Mores Hand Pies
- 2 sheets refrigerated pie crust dough (or puff pastry), thawed according to package instructions
- 1 cup graham cracker crumbs (about 8 full crackers, finely crushed)
- 1/4 cup unsalted butter, melted
- 1/4 cup granulated sugar
- 1/2 teaspoon vanilla bean paste
- 1 cup semi-sweet chocolate chips (or chopped chocolate squares)
- 1 1/2 cups mini marshmallows
- 1 large egg, beaten (for egg wash)
- 2 tablespoons water (for egg wash)
- Optional: Coarse sugar for sprinkling
The Simple Science of Sweet Assembly
Preparing the filling first is crucial, as it creates a stable base that won’t instantly dissolve the delicate pastry dough. We are essentially making a slightly buttery, crunchy graham layer that holds everything together beautifully. This also gives us a chance to practice patience, which is sometimes the hardest part of baking these handheld delights.
Step-by-Step Instructions for Perfect Results
- Prep the Graham Base:Preheat your oven to 400°F (200°C). Line two baking sheets with parchment paper. In a medium bowl, combine the graham cracker crumbs, melted butter, granulated sugar, and vanilla bean paste until the mixture resembles wet sand.
- Roll and Cut the Dough:Unroll the pie crust sheets onto a lightly floured surface. Using a large round or square cookie cutter (about 4 to 5 inches), cut out even shapes. You should yield about 8 to 10 shapes per sheet, depending on the size. Reroll scraps gently as needed.
- Layer the Filling:On one half of your dough cutouts (these will be the bottom), place a small spoonful of the graham mixture in the center. Top the graham base with approximately 1 tablespoon of chocolate chips, ensuring they stay centered. Finally, add a small cluster of mini marshmallows over the chocolate. Do not overfill!
- Seal the Pies:Brush the edges of the filled dough lightly with the egg wash (mix 1 egg with 2 tablespoons of water). Place the remaining dough cutouts (the tops) over the filling. Press down firmly around the edges to seal. Use the tines of a fork to crimp the entire perimeter, creating a decorative and structurally sound seal.
- Egg Wash and Vent:Transfer the assembled hand pies to the prepared baking sheets. Brush the tops of all the pies generously with the remaining egg wash. Use a sharp knife to cut 2 to 3 small vents in the top of each pie—this allows steam to escape and prevents blowouts. Sprinkle lightly with coarse sugar if desired.
- Bake to Golden Perfection:Bake for 12 to 15 minutes, or until the pastry is deeply golden brown and the filling is bubbling slightly. Let them cool on the baking sheet for at least 10 minutes before serving. That internal gooey filling needs time to stabilize unless you enjoy third-degree marshmallow burns.
Perfecting the Cooking Process
Start by chilling your dough thoroughly; cold butter is key to flakiness. Assemble the pies quickly, then brush with the egg wash before baking immediately. This sequence prevents the butter from melting out prematurely, guaranteeing those delicious layers and a golden finish every single time.
Add Your Touch
Swap standard milk chocolate for dark chocolate chips or white chocolate chunks for a twist. For a hint of warmth, stir a small pinch of cinnamon into the graham cracker crumbs. You could also sprinkle the tops with flaky sea salt just before serving to balance the intense sweetness perfectly.
Storing & Reheating
Store leftover hand pies in an airtight container at room temperature for up to three days, or refrigerate for five days. Reheat them quickly in a toaster oven or air fryer at 300°F (150°C) for five minutes to restore that crispy crust and gooey center.
Chef’s Insider Advice for Flawless Pies
- Ensure you crimp the edges tightly using a fork to prevent any chocolate or marshmallow lava from oozing out during the baking process.
- Opt for mini marshmallows over large ones, as they melt faster and distribute more evenly inside the small, portable pie pockets.
- Avoid overfilling the pies, which is a common mistake; leave plenty of margin around the filling so the dough can seal effectively without bursting.
My niece once tried to convince me that these hand pies were proof I possessed actual magical baking powers. I just smiled, knowing the real magic was in the butter and the sheer amount of chocolate.
Conclusion for Buttery S’Mores Hand Pies: A Deliciously Easy Recipe
This recipe proves that you don’t need a national park or an expensive fire pit to enjoy the nostalgic delight of s’mores. We’ve managed to capture all the crunch, chew, and chocolate melt of the classic treat and tuck it neatly into a beautiful, buttery, handheld package. By focusing on a flaky crust, controlled filling, and the right baking temperature, you can easily reproduce this beloved campfire dessert indoors.
Whether you are looking for a weekend baking project or a quick treat to impress unexpected guests, these Buttery S’Mores Hand Pies deliver on flavor and fun. Remember the tips on chilling the dough and sealing those edges well, and you will be enjoying your own pocketful of sunshine in under an hour. Now, go forth and bake something truly magnificent!
Print
Buttery S’Mores Hand Pies: A Deliciously Easy Recipe
Forget the campfire! These buttery, flaky hand pies deliver instant s’mores perfection. They combine rich chocolate, toasted marshmallow, and graham crunch inside golden pastry.
- Total Time: 35 minutes
- Yield: 4 servings 1x
Ingredients
- 1 box (2 sheets) refrigerated pie crusts
- 1 cup mini marshmallows
- 1 cup semi-sweet chocolate chips
- 1/2 cup finely crushed graham crackers
- 2 tablespoons unsalted butter, melted
- 1 large egg
- 1 tablespoon granulated sugar
Instructions
- Step 1: Preheat the oven to 400°F (200°C). Line a baking sheet with parchment paper. Unroll the pie crusts and, using a large cookie cutter or knife, cut out 8 to 10 equal-sized shapes (rectangles or circles).
- Step 2: Create the filling assembly. On half of the cut pastry pieces, sprinkle a layer of crushed graham crackers, followed by a spoonful of chocolate chips, and then a small pile of mini marshmallows, keeping the filling centered and away from the edges.
- Step 3: Prepare the seal. In a small bowl, whisk the egg with 1 tablespoon of water to create an egg wash. Brush the edges of the filled pastry pieces with the egg wash, then fold the matching empty pastry pieces over the top to create the hand pie.
- Step 4: Seal and vent the pies. Use the tines of a fork to firmly crimp and seal the edges of the hand pies. Cut two small slits (vents) in the top of each pie to allow steam to escape during baking.
- Step 5: Brush the finished pies with the melted butter and sprinkle generously with the granulated sugar. Bake for 12 to 15 minutes, or until the pastry is puffed and golden brown. Let cool slightly before serving, as the filling will be very hot.
Notes
- Store leftover hand pies in an airtight container at room temperature for up to 2 days; they are absolutely best when eaten the day they are baked.
- If the pies need a refresh, reheat chilled leftovers at 350°F (175°C) for 5-7 minutes in a toaster oven or air fryer to restore the flaky crust and gooey filling.
- For an extra indulgent treat, serve these buttery hand pies warm alongside a scoop of vanilla bean ice cream or a mug of hot cocoa.
- The key to a non-leaky pie is a firm seal; ensure you press the fork tines deep enough to join both crust layers securely after applying the egg wash, or the sticky filling will escape.
- Prep Time: 15 minutes
- Cook Time: 20 minutes
- Method: Stovetop
- Cuisine: American
Nutrition
- Serving Size: 1 Hand Pie
- Calories: 385
- Sodium: 280mg
- Fat: 20g
- Saturated Fat: 10.5g
- Trans Fat: 0.1g
- Fiber: 1.5g
- Protein: 25g


Leave a Comment