
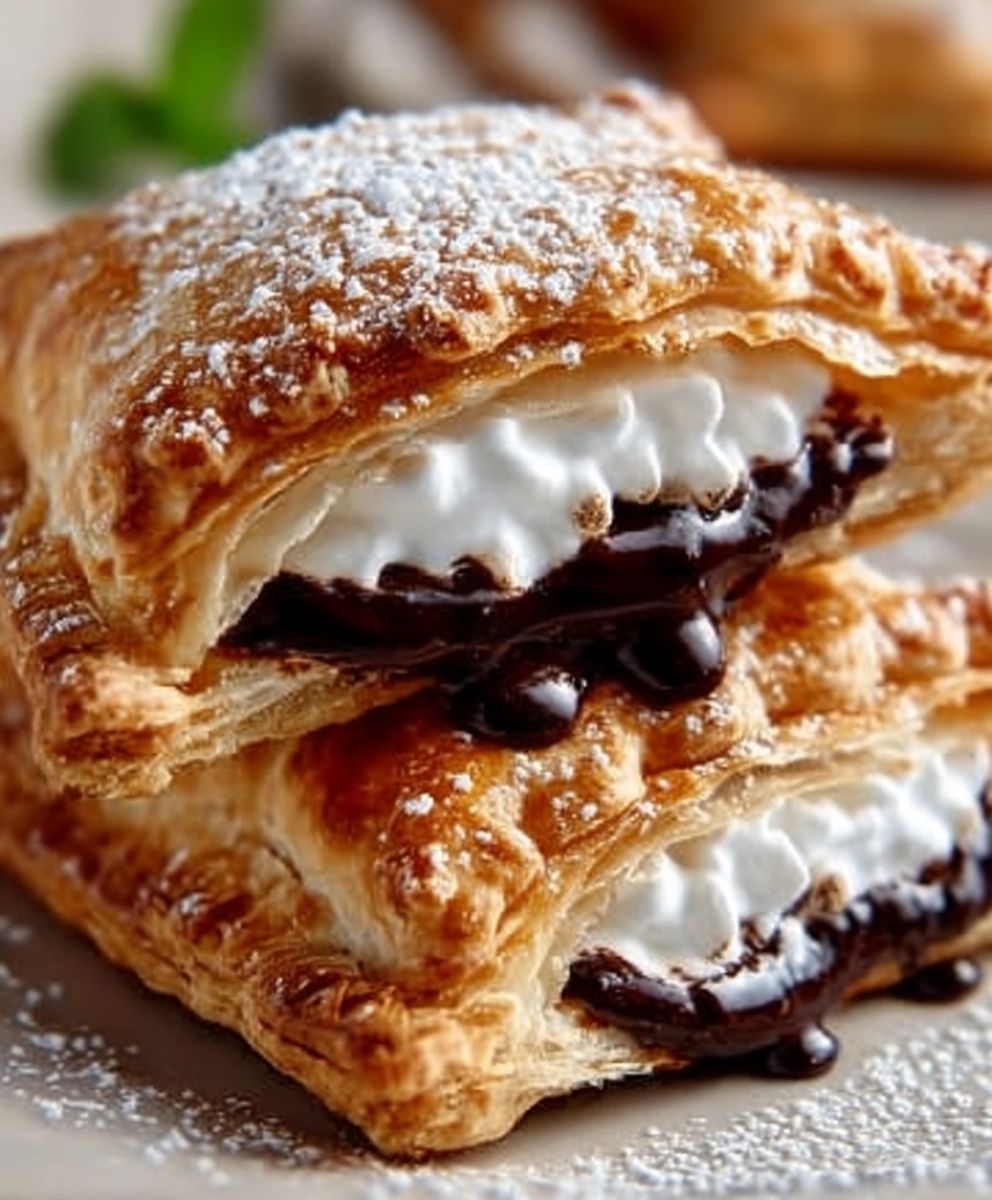
Buttery S’Mores Hand Pies: A Sweet Treat for Every Occasion
Buttery S’Mores Hand Pies are the perfect blend of nostalgia and indulgence, bringing the classic campfire treat right to your fingertips. Imagine biting into a warm, flaky crust that gives way to a gooey, chocolatey filling, all while the sweet aroma of toasted marshmallows wafts through the air. This delightful dessert not only satisfies your sweet tooth but also evokes cherished memories of summer nights spent around the fire.
The history of s’mores dates back to the early 20th century, where they became a beloved staple for campers and outdoor enthusiasts. Today, these buttery S’Mores hand pies have taken the traditional recipe to new heights, making them a convenient and portable option for any gathering. People love this dish for its delightful combination of textures—the crispiness of the crust paired with the rich, melty filling creates a symphony of flavors that is simply irresistible.
Whether you’re hosting a backyard barbecue or looking for a quick dessert to impress your friends, these buttery S’Mores hand pies are sure to be a hit. Join me as we dive into this easy-to-follow recipe that will have everyone asking for seconds!
Ingredients:
- 1 cup all-purpose flour
- 1/4 teaspoon salt
- 1/4 cup granulated sugar
- 1/2 cup unsalted butter, chilled and cubed
- 1/4 cup cold water
- 1/2 cup chocolate chips
- 1/2 cup mini marshmallows
- 1/4 cup graham cracker crumbs
- 1 egg, beaten (for egg wash)
- Powdered sugar (for dusting)
Preparing the Dough
- In a large mixing bowl, combine the all-purpose flour, salt, and granulated sugar. Mix well to ensure the dry ingredients are evenly distributed.
- Add the chilled, cubed unsalted butter to the flour mixture. Using a pastry cutter or your fingers, work the butter into the flour until the mixture resembles coarse crumbs. This step is crucial for achieving a flaky crust.
- Gradually add the cold water, one tablespoon at a time, mixing gently with a fork until the dough begins to come together. You may not need all the water, so add it slowly.
- Once the dough has formed, turn it out onto a lightly floured surface. Knead it gently just until it forms a cohesive ball. Be careful not to overwork the dough, as this can make it tough.
- Wrap the dough in plastic wrap and refrigerate for at least 30 minutes. This resting period allows the gluten to relax, making the dough easier to roll out later.
Preparing the Filling
- While the dough is chilling, prepare the filling. In a medium bowl, combine the chocolate chips, mini marshmallows, and graham cracker crumbs. Stir until the ingredients are well mixed.
- Taste the filling mixture and adjust the sweetness if desired. You can add a little more sugar or even a pinch of salt to enhance the flavors.
Rolling Out the Dough
- After the dough has chilled, remove it from the refrigerator. On a lightly floured surface, roll out the dough to about 1/8-inch thickness. Make sure to keep the surface and the dough lightly floured to prevent sticking.
- Using a round cutter or a glass, cut out circles of dough, approximately 4 inches in diameter. You should be able to get about 8-10 circles, depending on how thinly you roll the dough.
- Gather any scraps of dough, re-roll them, and cut out additional circles until all the dough is used.
Assembling the Hand Pies
- Preheat your oven to 375°F (190°C) and line a baking sheet with parchment paper.
- Take one circle of dough and place about 1 tablespoon of the filling mixture in the center. Be careful not to overfill, as this can cause the pies to burst during baking.
- Using your finger or a small brush, moisten the edges of the dough circle with a little water. This will help seal the hand pie.
- Fold the dough over to create a half-moon shape, pressing the edges together to seal. You can use a fork to crimp the edges for a decorative touch and to ensure they are well sealed.
- Repeat the process with the remaining dough circles and filling until all hand pies are assembled.
Preparing for Baking
- Once all the hand pies are assembled, place them on the prepared baking sheet, leaving some space between each pie.
- Brush the tops of the hand pies with the beaten egg. This will give them a beautiful golden color as they bake.
- Using a sharp knife, make a few small slits on the top of each hand pie. This allows steam to escape during baking and prevents them from bursting.
Baking the Hand Pies
- Place the baking sheet in the preheated oven and bake for 20-25 minutes, or until the hand pies are golden brown and flaky.
- Keep

Conclusion:
If you’re looking for a delightful treat that combines the nostalgic flavors of campfire s’mores with the convenience of a handheld dessert, then these Buttery S’Mores Hand Pies are an absolute must-try! The flaky, buttery crust perfectly encases a gooey, chocolatey filling, complemented by the sweet, toasted marshmallow flavor that will transport you back to summer nights spent around the fire. Each bite is a harmonious blend of textures and tastes that will leave you craving more.
For serving suggestions, these hand pies are incredibly versatile. You can enjoy them warm right out of the oven, allowing the chocolate to melt just a bit more, or let them cool for a delightful treat that’s easy to pack for picnics or lunchboxes. Pair them with a scoop of vanilla ice cream or a dollop of whipped cream for an indulgent dessert experience. If you’re feeling adventurous, consider adding a twist to the filling by incorporating peanut butter or Nutella for a unique flavor profile that will surprise and delight your taste buds. You could also experiment with different types of chocolate, such as dark chocolate or even flavored chocolate bars, to create your own signature version of these hand pies.
I encourage you to give this recipe a try and experience the joy of creating these Buttery S’Mores Hand Pies in your own kitchen. They are perfect for gatherings, family movie nights, or simply as a sweet treat to enjoy after a long day. Once you’ve made them, I would love to hear about your experience! Share your thoughts, any variations you tried, or even photos of your delicious creations on social media. It’s always exciting to see how others put their own spin on a recipe, and your feedback could inspire someone else to dive into the world of baking.
So, roll up your sleeves, gather your ingredients, and let’s get baking! These Buttery S’Mores Hand Pies are sure to become a favorite in your household, and I can’t wait to see how you make them your own. Happy baking!
Buttery S'Mores Hand Pies: A Deliciously Easy Recipe
These hand pies combine chocolate, marshmallows, and graham crackers for a s'mores-inspired treat. With a flaky crust and gooey filling, they're easy to make and perfect for sharing!
Ingredients
- 1 cup all-purpose flour
- 1/4 teaspoon salt
- 1/4 cup granulated sugar
- 1/2 cup unsalted butter, chilled and cubed
- 1/4 cup cold water
- 1/2 cup chocolate chips
- 1/2 cup mini marshmallows
- 1/4 cup graham cracker crumbs
- 1 egg, beaten (for egg wash)
- Powdered sugar (for dusting)
Instructions
- In a large mixing bowl, combine the all-purpose flour, salt, and granulated sugar. Mix well to ensure the dry ingredients are evenly distributed.
- Add the chilled, cubed unsalted butter to the flour mixture. Using a pastry cutter or your fingers, work the butter into the flour until the mixture resembles coarse crumbs.
- Gradually add the cold water, one tablespoon at a time, mixing gently with a fork until the dough begins to come together. You may not need all the water, so add it slowly.
- Once the dough has formed, turn it out onto a lightly floured surface. Knead it gently just until it forms a cohesive ball. Be careful not to overwork the dough.
- Wrap the dough in plastic wrap and refrigerate for at least 30 minutes.
- While the dough is chilling, prepare the filling. In a medium bowl, combine the chocolate chips, mini marshmallows, and graham cracker crumbs. Stir until well mixed.
- Taste the filling mixture and adjust the sweetness if desired.
- After the dough has chilled, remove it from the refrigerator. On a lightly floured surface, roll out the dough to about 1/8-inch thickness.
- Using a round cutter or a glass, cut out circles of dough, approximately 4 inches in diameter. You should get about 8-10 circles.
- Gather any scraps of dough, re-roll them, and cut out additional circles until all the dough is used.
- Preheat your oven to 375°F (190°C) and line a baking sheet with parchment paper.
- Take one circle of dough and place about 1 tablespoon of the filling mixture in the center.
- Moisten the edges of the dough circle with a little water to help seal the hand pie.
- Fold the dough over to create a half-moon shape, pressing the edges together to seal. Use a fork to crimp the edges.
- Repeat the process with the remaining dough circles and filling until all hand pies are assembled.
- Place the assembled hand pies on the prepared baking sheet, leaving space between each pie.
- Brush the tops of the hand pies with the beaten egg.
- Using a sharp knife, make a few small slits on the top of each hand pie.
- Place the baking sheet in the preheated oven and bake for 20-25 minutes, or until the hand pies are golden brown and flaky.
- Once baked, allow them to cool slightly before dusting with powdered sugar and serving.
Notes
- Ensure the butter is very cold for a flaky crust.
- Feel free to customize the filling with your favorite chocolate or add nuts for extra crunch.


Leave a Comment