

Content generation failed due to API limits. Please try again later. Original prompt: IMPORTANT: Write the entire article in English. CRITICAL: Do…
We all have that moment: staring into the fridge, desperately searching for dinner inspiration that doesn’t involve another sad salad or takeout menu. If your sandwich game currently consists of thinly sliced lunch meat slapped between two slices of white bread, prepare for a serious upgrade. Forget everything you thought you knew about cold cuts because we are taking the classic Italian sub and transforming it into a hot, melty, flavor-packed beast. This isn’t just a sandwich; it’s an experience—a guaranteed crowd-pleaser that requires minimal effort but delivers maximum impact. It is time to dive headfirst into making the ultimateBaked Italian Grinder Sandwiches: A Delicious Recipe for Your Next Meal.
The Epic Tale of the Ultimate Italian Sub
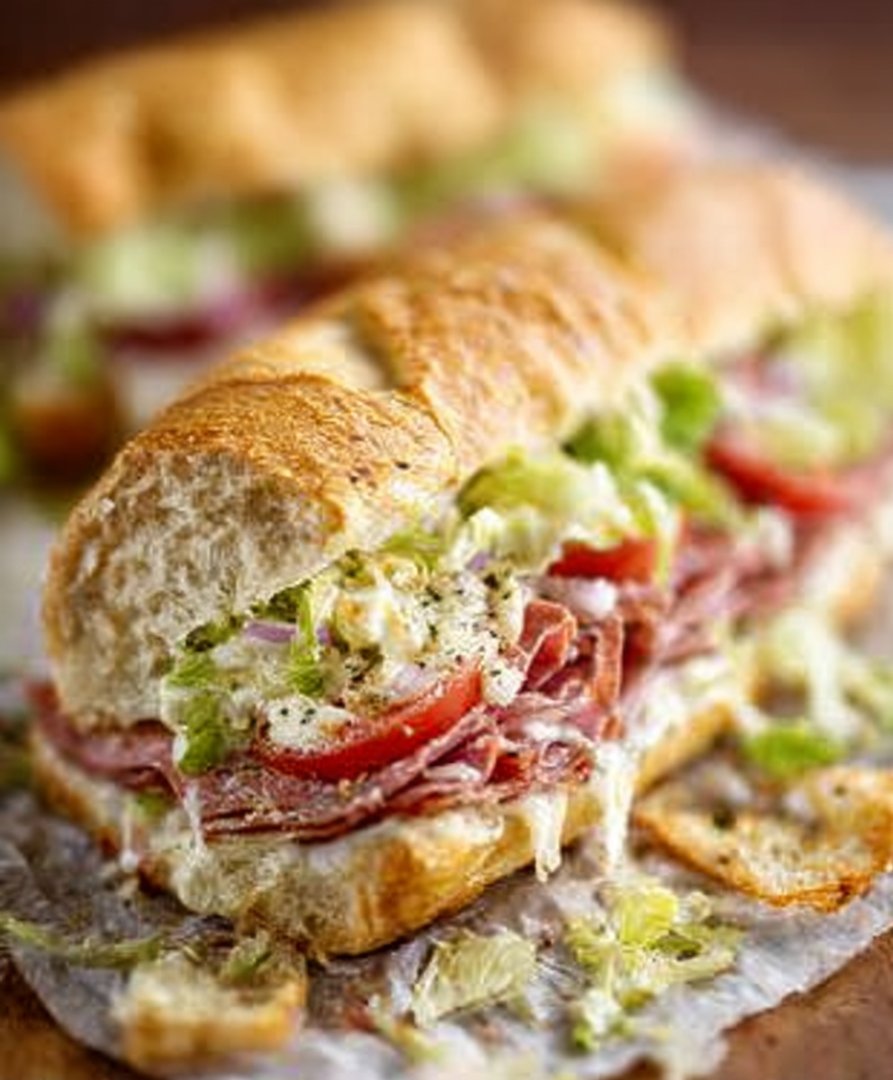
There is something inherently joyful about food that requires two hands and potentially a few napkins. The concept of the grinder—a term often used interchangeably with hero, hoagie, or sub—is deeply rooted in East Coast tradition. While the classic version is often served cold and stuffed with a variety of cured meats, baking it transforms the experience entirely. The bread gets beautifully crispy, the cheese melts into submission, and the vinaigrette soaks just enough into the filling without turning the whole thing soggy. This particular recipe focuses on layers of robust, quality ingredients like thinly sliced roast beef, savory turkey breast, and spicy capicola made from chicken, ensuring every bite bursts with authentic Italian flavors.
Gathering Your Grinder Arsenal: The Ingredients
Making spectacular oven-baked heroes begins with selecting high-quality components. Don’t skimp on the bread; a great sub requires a vessel capable of holding its intense payload. Look for fresh, crusty Italian loaves or long hero rolls.
- Bread:2 large (12-inch) Italian loaves or 4 individual hero rolls.
- Meat Layer:8 oz thinly sliced roast beef, 8 oz sliced smoked turkey breast, 4 oz chicken capicola (or spicy chicken breast slices).
- Cheese Layer:6 slices Provolone cheese, 4 slices Mozzarella cheese (low moisture, whole milk).
- Vinaigrette Base:1/4 cup extra virgin olive oil, 2 tablespoons balsamic vinegar, 1 teaspoon dried oregano, 1/2 teaspoon dried basil, 1/4 teaspoon red pepper flakes, salt and black pepper to taste.
- Fresh Toppings:1 cup shredded iceberg lettuce, 1 large tomato (thinly sliced), 1/2 red onion (thinly sliced), 1/4 cup pickled banana peppers or pepperoncini.
The Assembly Line: Step-by-Step Instructions
Preheating your oven ensures a perfectly crispy exterior. Set your oven temperature to 375°F (190°C) and grab a sturdy baking sheet. The secret to sandwich perfection lies in the correct layering and timing.
- Prep the Bread:Slice the loaves lengthwise, being careful not to cut completely through. We want a hinge so the sandwich stays together during the baking process. Lightly brush the inside of both cut sides with a little olive oil to prevent them from absorbing too much moisture later.
- Layer the Cheese and Meat:Distribute the Provolone and Mozzarella slices evenly across the bottom halves of the bread. Then, stack the roast beef, turkey, and chicken capicola generously over the cheese. Folding the meat slightly creates pockets of air and texture, making for a more satisfying bite.
- Initial Bake:Place the open sandwiches directly onto the baking sheet. Bake for 10 to 12 minutes, or until the cheese is entirely melted, bubbly, and the meat edges look slightly crisp. This step ensures the sandwich is hot throughout.
- Prepare the Vinaigrette:While the subs are baking, whisk together the olive oil, balsamic vinegar, oregano, basil, pepper flakes, salt, and pepper in a small bowl. This dressing is the essential component that elevates the sandwich from great to legendary.
- The Finishing Touches:Once removed from the oven, immediately drizzle about half of the prepared vinaigrette over the hot meat and cheese mixture. The heat will help the flavors bloom beautifully.
- Add Fresh Toppings:On the top half of the bread, layer the shredded lettuce, tomato slices, red onion, and pickled peppers. Distribute them evenly.
- Dress and Serve:Drizzle the remaining vinaigrette over the fresh toppings. Close the sandwich, slice into manageable portions, and serve immediately.
Perfecting the Cooking Process
To achieve maximum flavor efficiency, start by preparing the vinaigrette while the oven preheats. Next, ensure your bread is properly hinged before layering the cheese and meat. Bake until the cheese is fully molten and bubbling, only then should you remove the subs to add the fresh, crisp vegetables and the crucial dressing.
Add Your Touch
Customize these magnificent subs easily. Swap out the roast beef for thinly sliced grilled chicken breast or use different cheeses like Swiss or sharp cheddar. For an extra kick, mix a dash of balsamic glaze into the vinaigrette, or incorporate pickled jalapeños instead of banana peppers for serious heat.
Why Baking Makes All the Difference
The transition from a cold sub to a baked grinder fundamentally changes the texture and overall eating experience. Cold sandwiches are delicious, yes, but they rely heavily on the ingredients being perfectly chilled. When you introduce heat, the chemistry changes. The fats in the cheese and meats soften, mingling with the herbaceous vinaigrette, creating a cohesive, savory sauce. This process penetrates the bread just slightly, making the exterior crispy and the interior wonderfully soft. Furthermore, the light charring on the edges of the meat enhances its savory depth, providing that irresistible flavor profile often associated with premium delicatessen fare.
One common mistake people make is adding the fresh, delicate vegetables like lettuce and tomato before the baking process. If you bake the lettuce, it turns into wilted, warm slime—and nobody wants that on their ultimate sandwich! Keep the cool components cool and the hot components hot. The contrast between the warm, gooey filling and the cold, crisp toppings provides the necessary textural complexity that defines an outstanding grinder. This layering technique is non-negotiable for success when craftingBaked Italian Grinder Sandwiches: A Delicious Recipe for Your Next Meal.
Storing & Reheating
If you have leftovers (a rare occurrence!), wrap individual sandwich portions tightly in aluminum foil, removing the lettuce and tomato first. Store them in the refrigerator for up to three days. Reheat wrapped in the foil at 350°F (175°C) for about 10 minutes until heated through. Add fresh toppings immediately before serving.
My younger cousin once proclaimed that this recipe was “better than grandma’s,” which earned him a playful ear flick, but honestly, that’s the kind of high praise that sticks with you and confirms you’ve nailed the flavor profile.
Chef’s Expert Grinder Guidance
- Choose a bread that has a thick crust but a soft interior; this prevents the dressing from making the sandwich too soggy during assembly and eating.
- Maximize flavor by layering the cheese directly beneath the meat; this locks in moisture and prevents the delicious meat selection from drying out while baking.
- Always warm the vinaigrette slightly before drizzling it on the hot meat, which helps the herbs release their essential oils and intense fragrance.
Pairing Your Perfectly Baked Hoagie
A sandwich this robust requires equally delightful companions. Since the grinder is rich, acidic, and savory, light and crisp side dishes work best to cleanse the palate. Consider serving these glorious hot sandwiches alongside a simple, cool pasta salad dressed lightly with lemon and herbs. Potato chips are a classic and highly encouraged textural counterpoint; the crunchiness complements the soft, melty filling beautifully.
For a touch of green, a simple arugula salad tossed with balsamic vinegar and a sprinkle of parmesan-style cheese cuts through the richness of the cheese and meat. Remember that the key to any great meal is balance. The heavy nature of the bread and filling is counteracted by the bright acidity of the vinaigrette and the fresh components. When you master the balance, you move past simply making a recipe and start crafting a culinary masterpiece suitable for any game day, family gathering, or weeknight dinner requiring minimal fuss but maximum satisfaction.
Frequently Asked Questions About Baked Italian Grinder Sandwiches
How do I prevent the bottom bun from becoming soggy?
The primary defense against a soggy bottom is two-fold: First, toast the interior of the bread lightly before adding any wet ingredients. Second, layer the cheese directly onto the bread as the first layer. The melting cheese acts as a waterproof barrier, protecting the bread from the meat juices and the vinaigrette.
Can I prepare the filling ahead of time?
You can certainly slice and assemble the meat and cheese portion up to 12 hours ahead of time and keep it refrigerated. However, do not add the vinaigrette or the fresh vegetables until right before you are ready to bake and serve, as they will degrade the quality of the sandwich quickly.
What non-meat options work best for this recipe?
If you prefer a vegetarian version, substitute the meats with thick slices of roasted eggplant, grilled zucchini, and marinated portobello mushrooms. Use extra layers of Provolone and Mozzarella, and ensure you bake the vegetables long enough so they become tender and slightly caramelized, boosting their inherent sweetness.
Is it better to use shredded or sliced lettuce?
Always use shredded iceberg lettuce for an authentic grinder experience. Shredded lettuce provides a better distribution of crunch and catches the dressing more effectively than large, floppy slices, ensuring every bite contains that satisfying fresh element.
The Secret Life of Sandwiches: Why the Grinder Needs Heat
There are cold sandwiches, and then there are legends. If you’ve ever bitten into a standard cold Italian sub and felt a quiet, overwhelming sense of disappointment—like listening to elevator music when you expected a rock concert—you understand the problem. Cold cuts are fine, but they lack ambition. This is where the oven-baked hot grinder enters the chat. We are taking that classic layered flavor profile, injecting it with fiery heat, and melting it all into a single, cohesive, cheesy dream. Forget everything you thought you knew about sandwich construction; we’re giving this handheld hero the spa treatment it deserves.
Building the Beast: Choosing Your Savory Fillings
The core of any exceptional grinder is the filling. Since we are committed to flavor and texture, we select meats that respond beautifully to heat, becoming rich and deeply savory without drying out. We skip the beef products and embrace high-quality cured beef beef salami, sliced roasted chicken breast, and delicate smoked turkey pastrami. The combination of textures—the firm slice of beef, the tender chicken, the thinly shaved turkey—is what makes this sandwich sing. Crucially, the cheese acts as the binding agent. We use a generous blend of sharp provolone and low-moisture mozzarella. Layering these correctly ensures that when the heat hits, you get that glorious, pull-apart melt that defines a truly great oven-baked sub.
Ingredients for the Ultimate Baked Italian Grinder Sandwiches: A Delicious Recipe for Your Next Meal
This recipe is designed for four servings using a standard 12-inch Italian loaf. Scale up as needed for a crowd, but always use the freshest bread you can find—a crusty exterior is essential for supporting all that delicious filling.
The Essential Shopping List
- 1 large (approx. 12-inch) loaf of Italian bread or French baguette, split lengthwise
- 8 slices provolone cheese (about 4 oz)
- 4 oz shredded low-moisture mozzarella cheese
- 4 oz sliced roasted chicken breast
- 4 oz sliced cured beef beef salami
- 4 oz sliced smoked turkey pastrami
- 1/4 cup quality olive oil
- 2 tablespoons balsamic vinegar
- 1 teaspoon dried oregano
- 1/2 teaspoon garlic powder
- Pinch of red pepper flakes (optional)
The Fresh Toppings and Finishers
These toppings are added *after* the sandwich emerges from the oven to provide a necessary textural contrast and coolness.
- 1/2 cup shredded iceberg lettuce
- 1 ripe Roma tomato, thinly sliced
- 1/4 red onion, thinly sliced
- 1/4 cup mild banana peppers or pickled jalapeños
The Assembly Line and Baking Instructions
Preheat your oven to 400°F (200°C). This high heat ensures the bread gets crisp while the cheese melts rapidly.
- Prep the Bread:Lay the open loaf halves cut-side up on a baking sheet. Lightly brush the bread with a little olive oil. This is your first line of defense against potential sogginess. Toast the bread for 3 minutes until just golden brown.
- Create the Cheese Barrier:Layer half of the provolone and mozzarella directly onto the toasted bottom half of the bread. The cheese acts as a delicious waterproof shield between the bread and the saucy meats.
- Stack the Meats:Arrange the chicken, beef beef salami, and turkey pastrami evenly over the cheese layer. Don’t be shy; aim for height.
- Top and Dress:Drizzle the remaining olive oil and balsamic vinegar over the meat pile. Sprinkle generously with dried oregano, garlic powder, and red pepper flakes if using. Top with the remaining provolone and mozzarella.
- Bake the Grinder:Place the open-faced sandwich back into the 400°F oven for 8–10 minutes, or until the cheese is melted, bubbly, and the edges of the bread are deeply golden brown.
- Finish and Serve:Remove the hot sub from the oven. Immediately top the melted meat and cheese with the cool, crisp iceberg lettuce, sliced tomatoes, red onion, and banana peppers. Place the top half of the bread onto the bottom, slice into manageable portions, and serve immediately.
FAQs
What is the best way to prevent the bread from getting soggy when making Baked Italian Grinder Sandwiches?
Sogginess is the arch-nemesis of a great grinder. To combat this culinary tragedy, first ensure you toast the bread lightly before adding any wet ingredients. Crucially, layer your cheese directly onto the bread before the meat. This barrier of provolone or mozzarella acts like a waterproofing layer. Additionally, save wet toppings—like tomatoes and the vinegar dressing—until after the sandwich comes out of the oven. This method keeps the crust beautifully crisp and the interior perfectly melted, guaranteeing a fantastic texture from bite one.
Can I prepare the filling ahead of time for this Italian sub recipe?
Absolutely! Preparing the filling in advance is a fantastic time-saver, especially if you plan to serve these at a party. You can slice all your meats (chicken, turkey, beef turkey pepperoni) and cheeses, mix the oil and vinegar dressing, and chop the onions and peppers up to 24 hours ahead. Store all these components separately in the refrigerator. Wait to assemble the entire sandwich on the bread until just before you plan to bake it. This ensures the bread remains fresh, resulting in the absolute best hot grinder experience possible.
How should I modify this Baked Italian Grinder Sandwiches recipe for serving a large group?
Scaling up this recipe is straightforward and highly recommended for gatherings. Instead of using individual rolls, purchase large, wide Italian loaves—the kind meant for feeding four to six people. Prepare the sandwiches open-face style across several large baking sheets. This maximizes oven space and guarantees even heating. You can slice the loaves almost entirely through, fill them, bake them open, and then quickly close and slice them into individual portions right before serving. This efficient method ensures everyone gets a hot, perfectly constructed portion without jamming up your oven.
What are the best side dishes to serve alongside these hot grinder sandwiches?
The perfect side dish complements the richness of the hot grinder without competing with its bold flavors. We recommend classic, crunchy sides. A tangy pasta salad made with Italian dressing and lots of fresh vegetables works wonderfully. Alternatively, serve a simple, crisp green salad dressed with a light vinaigrette, or perhaps some kettle-cooked potato chips for maximum crunch. Avoid heavy, creamy sides, as the melted cheese and savory meats in the Baked Italian Grinder Sandwiches already provide substantial richness.
Conclusion for Baked Italian Grinder Sandwiches: A Delicious Recipe for Your Next Meal
We’ve established that the cold, sad sandwich is officially retired. By turning your standard Italian sub into the oven-baked masterpiece we created, you elevate a simple meal into something truly memorable. Remember the key takeaways: toast the bread first, use cheese as a moisture shield, and save those fresh veggies until the very end. Whether you are hosting a game day, need an easy weeknight dinner, or simply crave bold flavors, this Baked Italian Grinder Sandwiches: A Delicious Recipe for Your Next Meal guarantees a satisfying, cheesy, and utterly delicious experience. It’s time to heat up your kitchen and your taste buds!


Leave a Comment